Biscuits, Signature Bake

Signature Bake: Apricot, Cashew, and White Chocolate Biscotti

About a week ago, I got a call on my phone from one of my all-time favorite people, Mrs. B. Just hearing her voice and I am overtaken by a wave of nostalgia and warm-fuzzies. From the time I was nine to when I was seventeen, my siblings and I would pile in the minivan and be driving to her house to get piano and voice lessons and we just loved her. The bond between young musician and mentor is this weird and sacred thing. Yes, the mentor has to impart musical knowledge and skill, but they also become this sounding board for your self-esteem. I depended on Mrs. B.’s constant assurance that my musical talents were worthwhile and promising and she always made me feel like a star pupil – though I suspect she made all of her students feel that way. There is no describing Mrs. B., really. She’s vivacious, outspoken, and had a knack for saying the thing that makes me blush nineteen shades of red. She always planned the kickin’est student recitals and she wore a leopard print dress to my wedding. She’s family to me, and I take more after her than I do most of my blood relatives.

She was calling because she was going to be in town and an old student of hers was going to be hosting a party – a potluck. The two innocent syllables “pot” and “luck” are like the sound of a revving engine in my mind. A potluck is not just a gathering of people a party. A potluck is a party that I can win. I can bring the most delicious dessert that is the talk of the evening that puts someone’s pathetic box cupcakes to shame. Your open bag of Oreos is an embarrassment next to my delectable, homemade delight. Oh, my secret ingredient? Love… and crushing you!!!

Picking what to bring is where potlucks are won and lost. First and foremost, I never dare to bring an entrée. There are just too many variables there, the primary being temperature. When you’re not the host of the party, you don’t know how long it’s going to be before the food item is served, if you’ll have easy access to a microwave, or a place to reheat your dish. You can do the baller move of bringing a crock-pot, which when executed perfectly generally takes the day. There is nothing that can compete with a spicy meatball or a saucy chicken wing from a crockpot, but you do run the risk of the main table not being near an outlet. Then you’re as subject to temp as any cheesy casserole.

Dessert is the way to go. It is everyone’s favorite. If you say you’re a savory person, I can’t even relate to you. I’m instantly skeptical. “What? Don’t have a sweet tooth?! What are you hiding? Are you saying I’m fat?!” But even dessert has pitfalls. I generally like to do cupcakes, but buttercream icing can also be subject to temperature and when given a smorgasbord of desserts, some people may skip the standard sized cupcake to get a variety of smaller, inferior treats. Or they do the offensive move of splitting a cupcake, which there must be a ring in hell for those monsters. You better be sharing that with a friend, villain! Don’t clutter my presentation with your remnants.

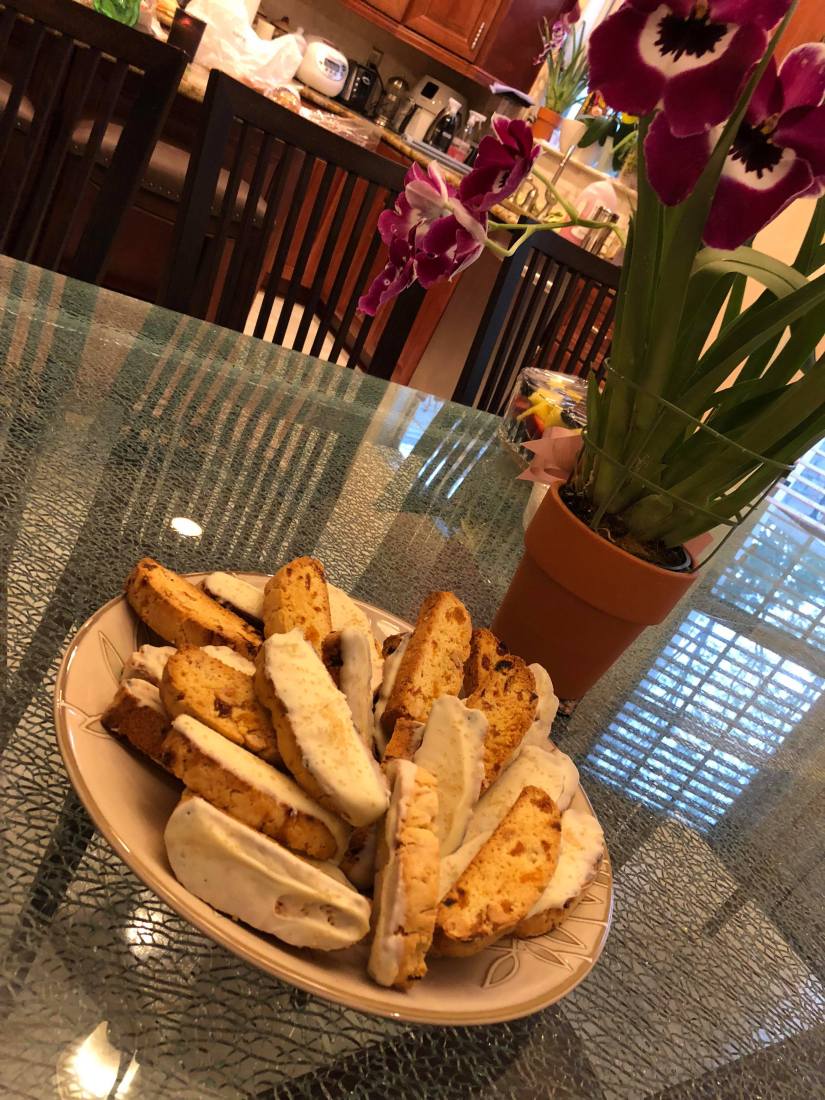
I decided to go biscotti. Not a lot of people have tried their hand at biscotti, so odds were I was not going to have any direct competition like I would with a brownie or chocolate chip cookie. They also don’t look like the sugar bomb that they are, which hooks in the devious “I don’t go for sweets” crowd. They go well with coffee, which an evening event will inevitably end with, and they make a great conversation piece. “Oh! You just bake them twice! That’s how they got their name. ‘Bis’ means ‘twice’ in Latin.” Carefree, smug chuckle! I decided to go with the flavor combination of dried apricots, cashews, and white chocolate – sophisticated flavors to celebrate a sophisticated lady. I pity the fool who makes a Rice Krispie Treat in my dojo.

On Your Marks, Get Set… Bake!

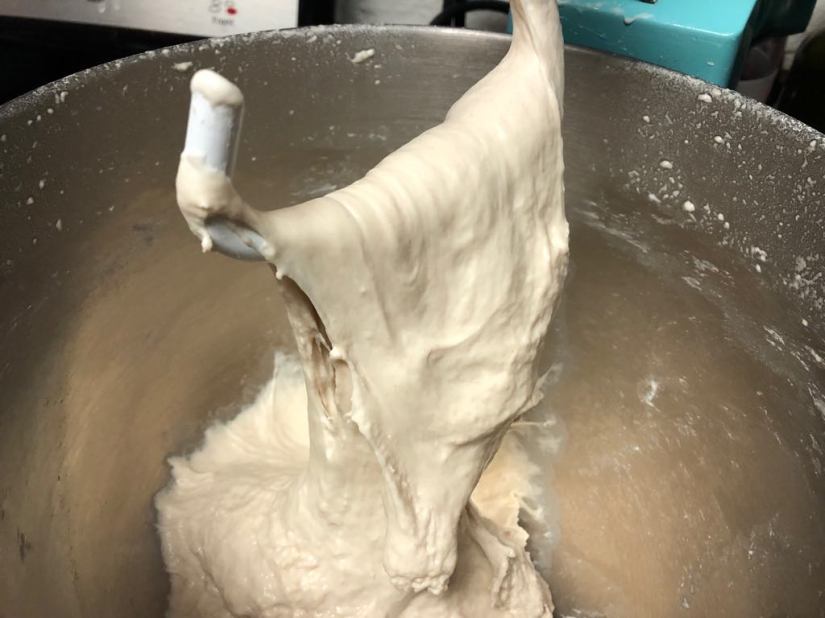
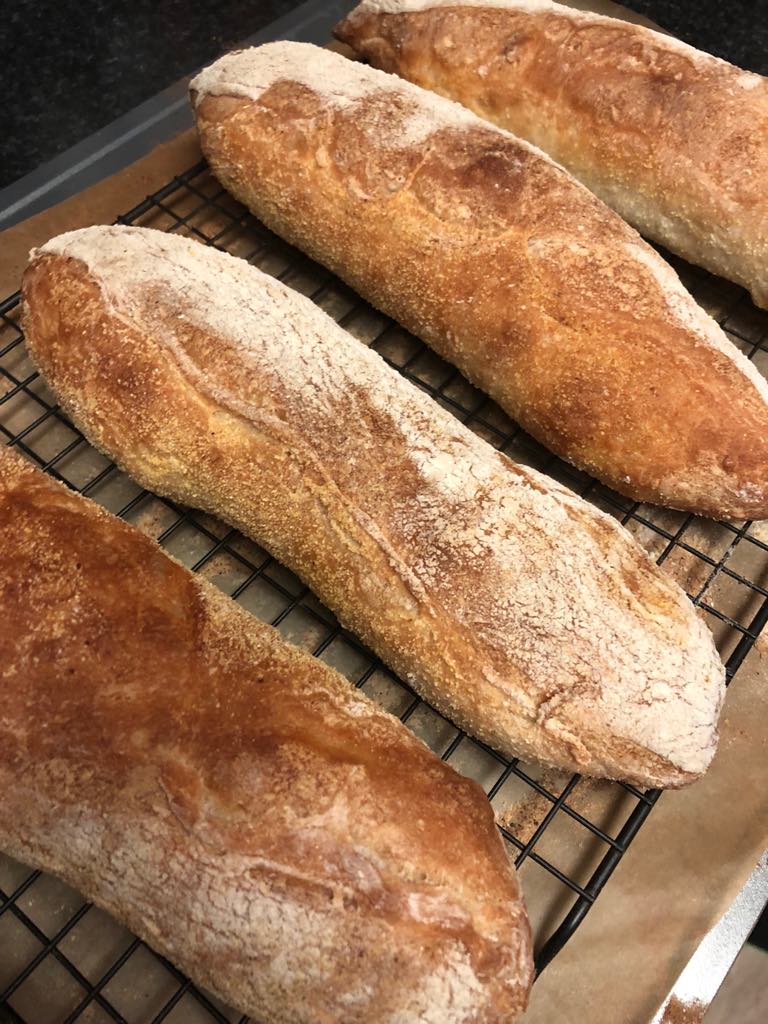
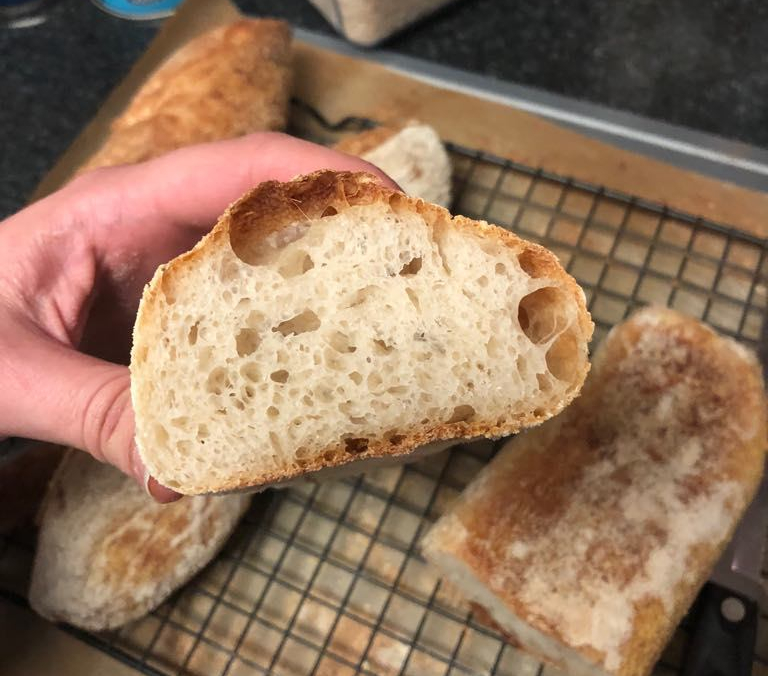
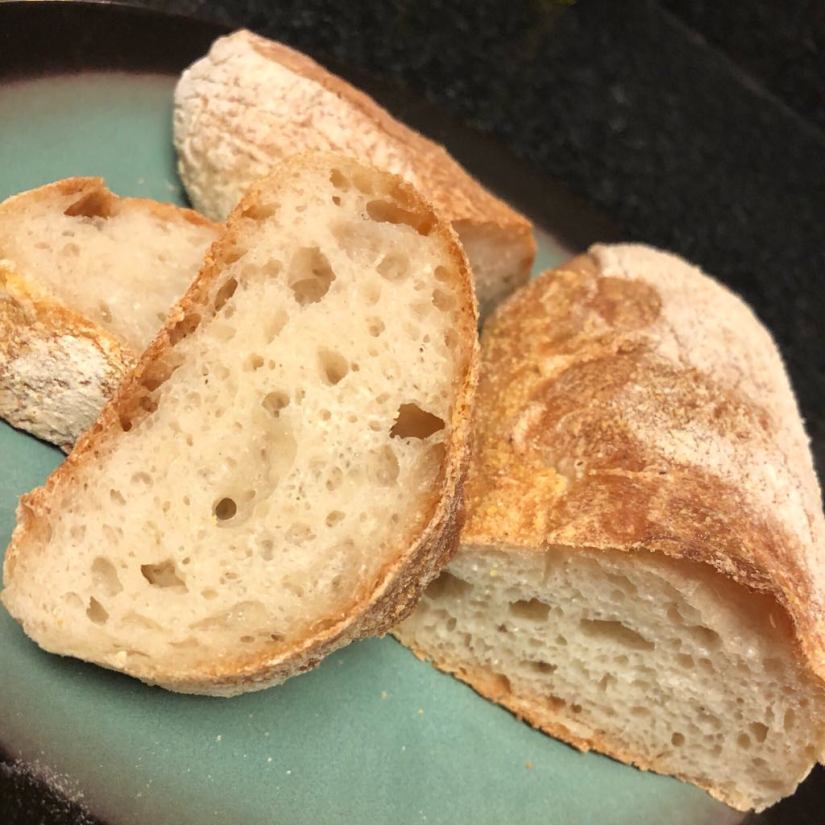
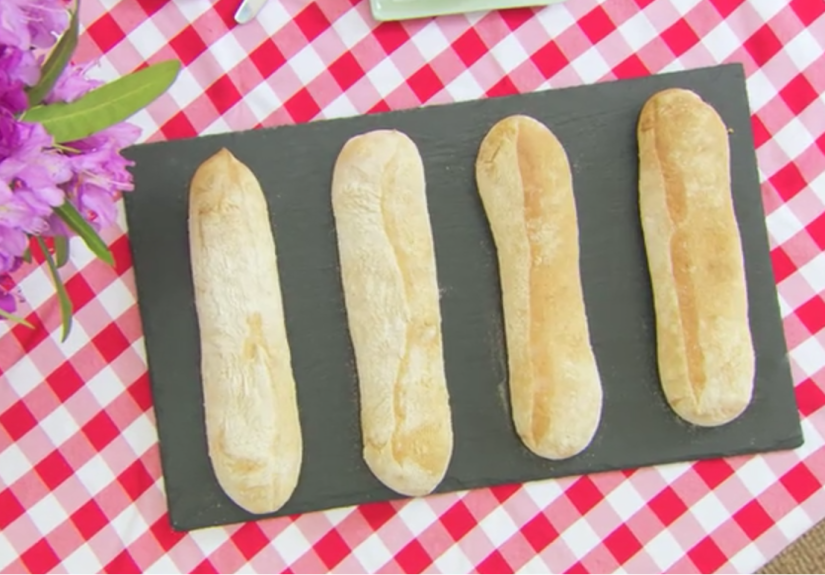
Mise en place? More like ‘messy place’. I made these biscotti in the middle of a baking hurricane – a failed attempt to multitask. Not only was I going to a potluck gathering that night, but my brother’s family were going to be in town for one day and I offered to provide the ciabatta loaves for lunch. I nailed it once, so what could possibly go wrong? Oh, many things, Lisa. A myriad of things. I think I rushed my dough a bit, and when I added my last quarter of water the dough ball just disintegrated. I should’ve just tossed it at that point and started over like many a #GBBO baker, but I let the stand-mixer keep going and the dough kinda’ came back together. It seemed wetter than last time, but I threw it in the proving box anyway and hoped for the best. Long story short, when I went to cut the dough, it just went <insert raspberry sound>. I ended up just feeding my pathetic yeast sludge to our InSinkErator.

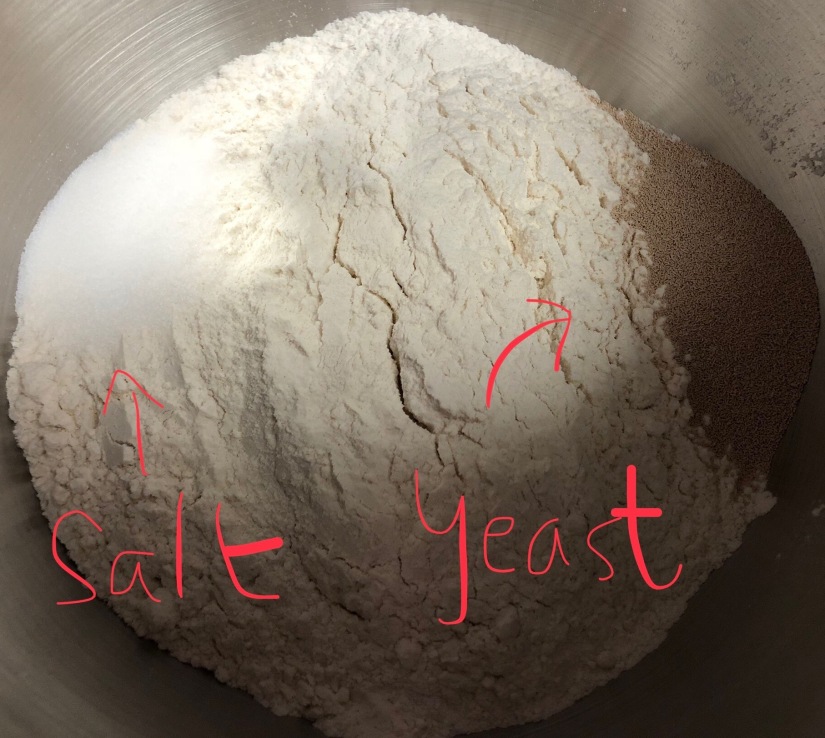
It was while my disappointment was still in the proving box – inflating like it wants to be bread or something (lies!) – I started by whisking my four, baking powder and salt together for my biscotti.

Make a sugar omelet. I then melted my butter on the stove and poured it into my large bowl. To that, I added my sugars and my almond extract. I decided to use half granulated sugar and half demerara sugar because the demerara is such a beautiful rich color and I figured that it was a nice way to get the molasses-y, unrefined flavor of brown sugar without adding any moisture. I beat the butter and sugars together and then kept the hand mixer going while I added my eggs one at a time. Throw this mixture on I hot griddle, and I figure this is what peeps have for breakfast.


BDB Butter Sugar and Eggs
I really need to work on my pictures. This is… unacceptable.


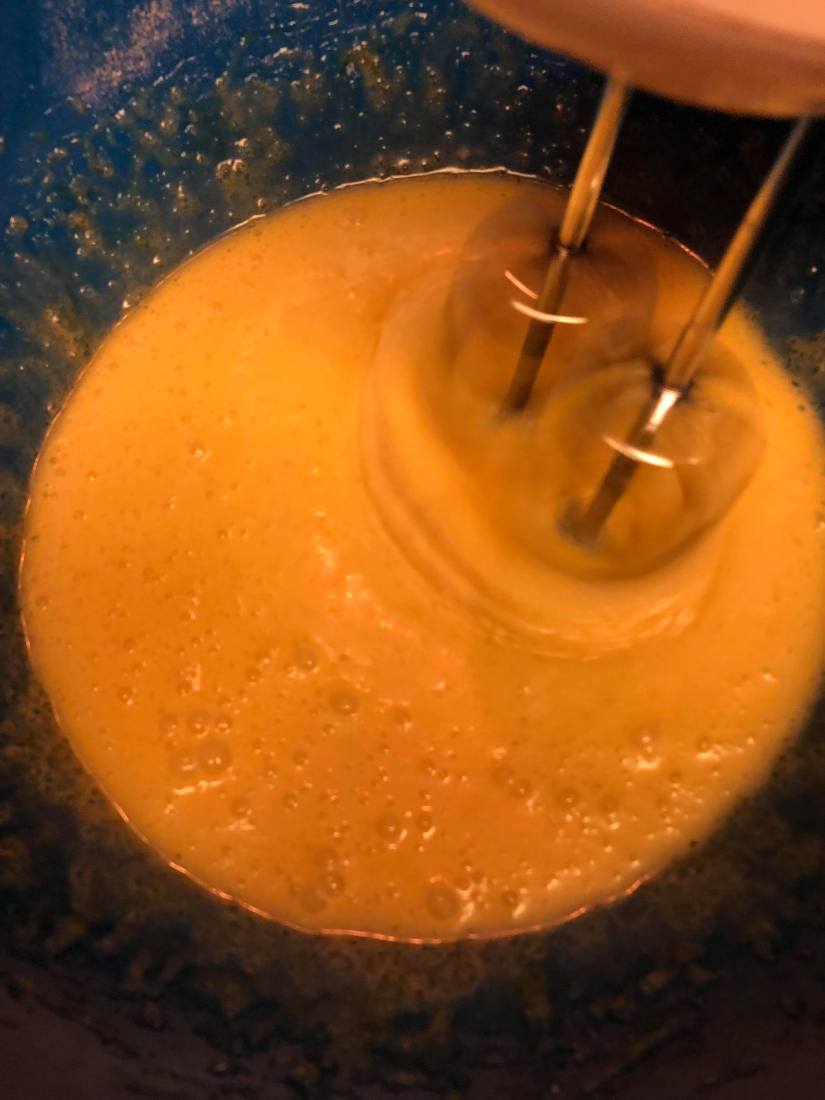
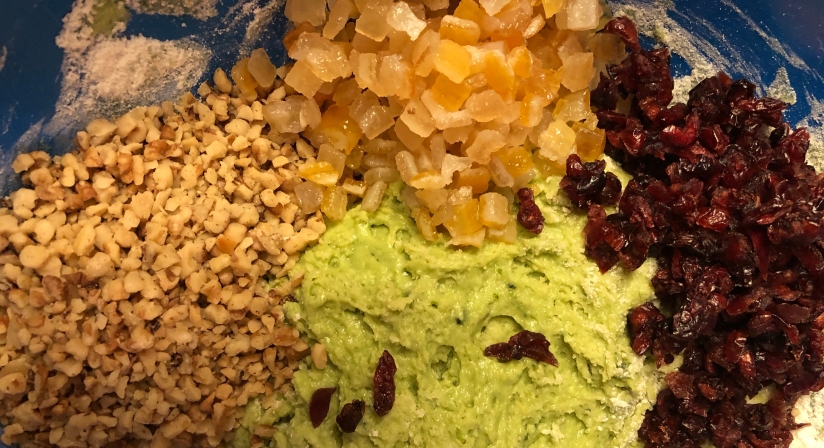
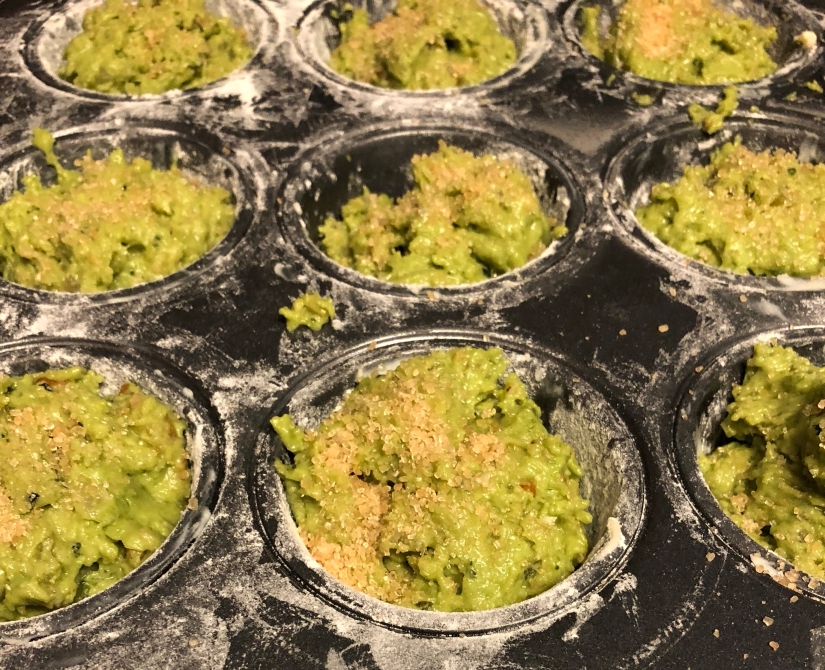
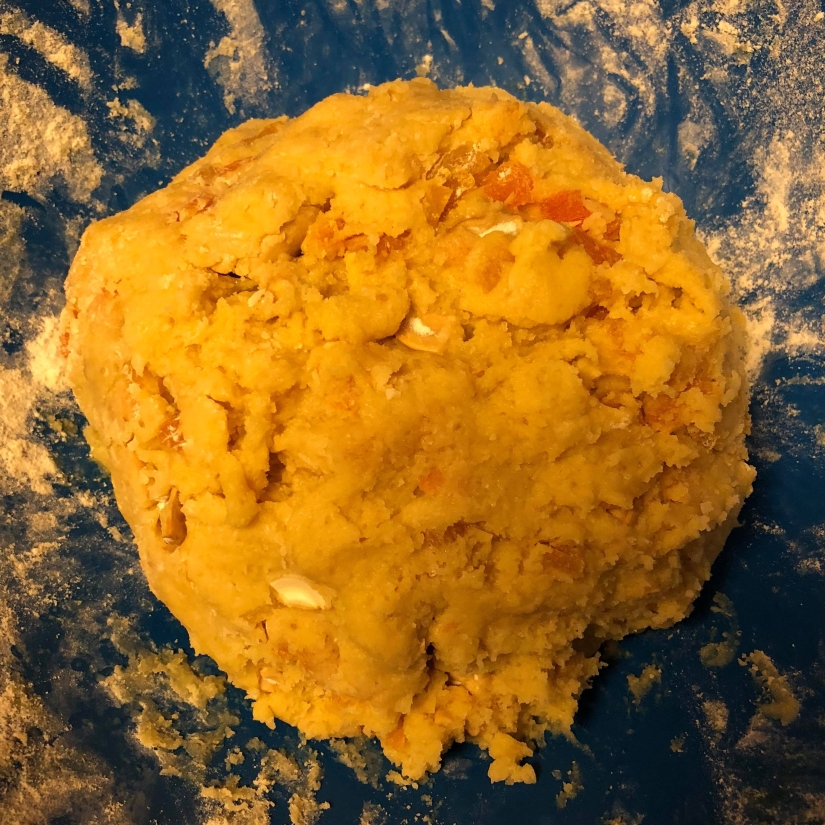
Pull yourself together. I then added my flour, apricots, and cashews all at once to my egg-y sugar mixture and gave it a mix with my big rubber spoonula until I saw no more white flour. I then reached my mitts in there and patted the dough into a ball, threw some saran over it and tossed it into the fridge.


BDB Biscotti Dough
This dough needs to chillax!


It was while my biscotti dough was fridging, getting all chilled so I could mold it, that I poured out my ciabatta mistake, had my heart broke, and dispatched it with the whirring blades of my garbage disposal. When I woke that chilled ball from its 30-minute hibernation, it had way more riding on it than anticipated.

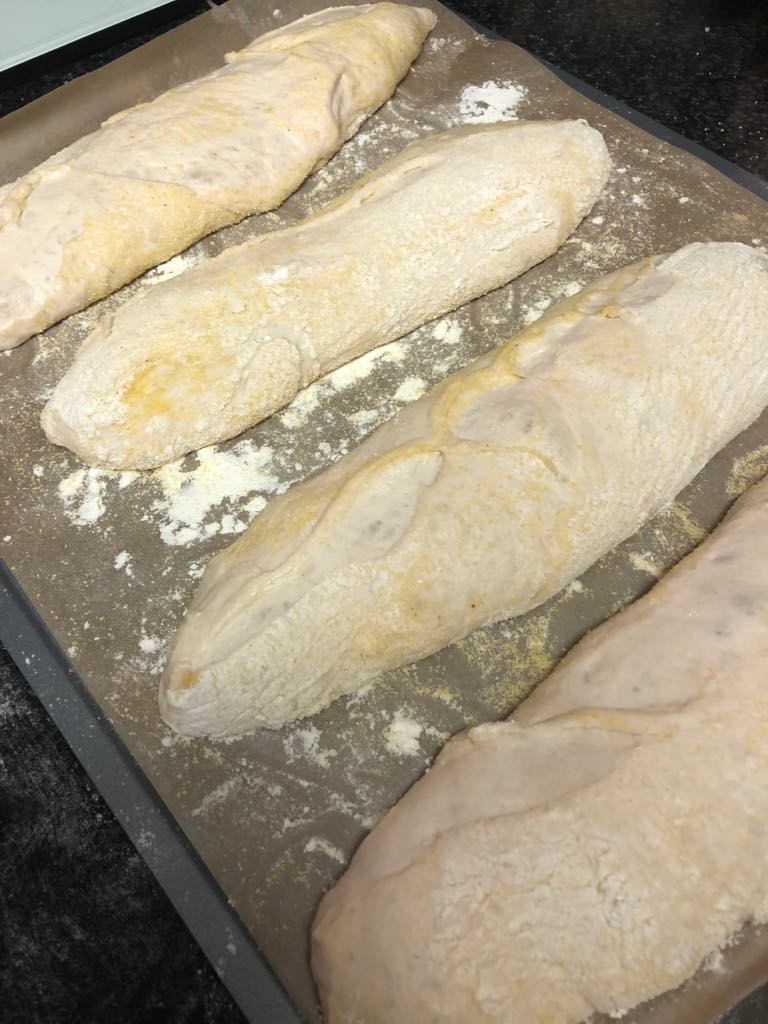
Log lady. With I heavy sigh, I preheated my oven to 350° F, covered my cookie sheet with parchment paper, and took my biscotti dough out of the refrigerator. This dough ball, bearing the weight of all my baking esteem, was then split in twain and molded into two 12” by 2” dough logs. In poor blogger form, I totally forgot to take a picture, but they looked something like this.

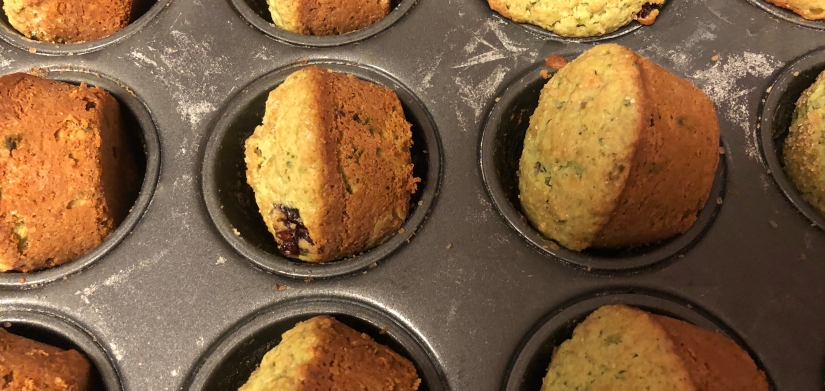
Cotti. I then put the logs in the oven for the first bake for 25 minutes. When my timer went off, logs had puffed and spread a bit and the edges had started to become golden but when I poked the top, they were still a bit soft. The directions from Real Simple indicated that they should be firm, so I gave them another two minutes with my fingers crossed that the edges wouldn’t get too dark. When I finally took them out, the edges were still a fine color.

BDB Biscotti Logs

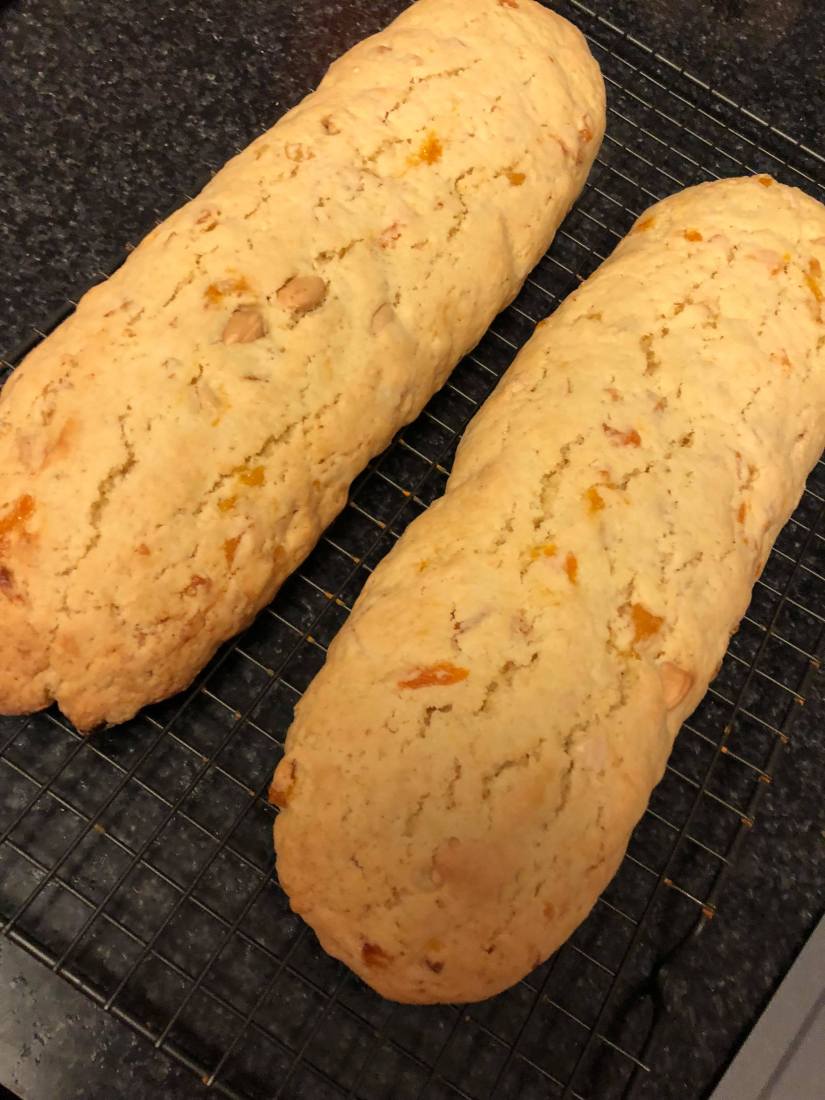
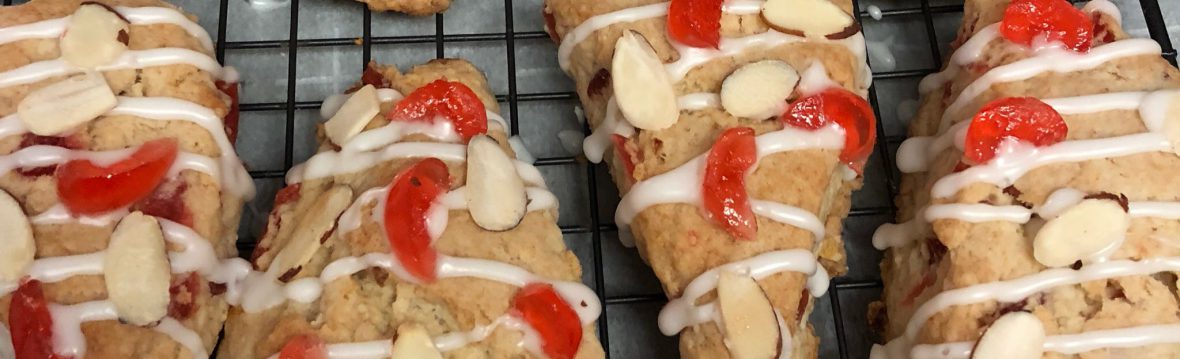
Make the cut. After letting my hot logs hang on the cooling rack for 15 minutes, it was time to make the cut. If you try to slice your biscotti while they are still too warm, they’ll fall apart, but if you wait too long they may be too hard to get through. I transferred my logs to the cutting board and used my ruler to make sure I got even half-inch slices. Looking at the slices you can see that the center is still a bit moist, and not the quintessential biscotti crisp, hence the second baking. They look pretty, though, with the orange jewels of apricot.

Biscotti. I needed a second cookie sheet to accommodate all of my slices, which would mean that my second bake would take two racks of my oven, which would mean I would have to keep my eye on them for evenness. I popped the slices back into the oven for the second bake and set the timer for 18 minutes.

Though the window of the oven, the two racks seemed to be baking fairly evenly, when the timer went off and I opened the door I got a little puff of smoke smell in my face. Uh oh! When I took my cookies out and flipped them, I saw that the cashews that were against the cookie sheet had blackened and burned. Cashews are pretty high in fat – much higher than almonds, which is why they’re hands down way more delicious and I’ll fight anyone who disagrees with me – but it also means they burn easier. Oh well, nothing a little white chocolate won’t cover up, am I right?

The burn could have totally been avoided if I had flipped the cookies halfway through the second bake, which I’ve included in the recipe below so you won’t have to suffer the humiliation of singed nuts.

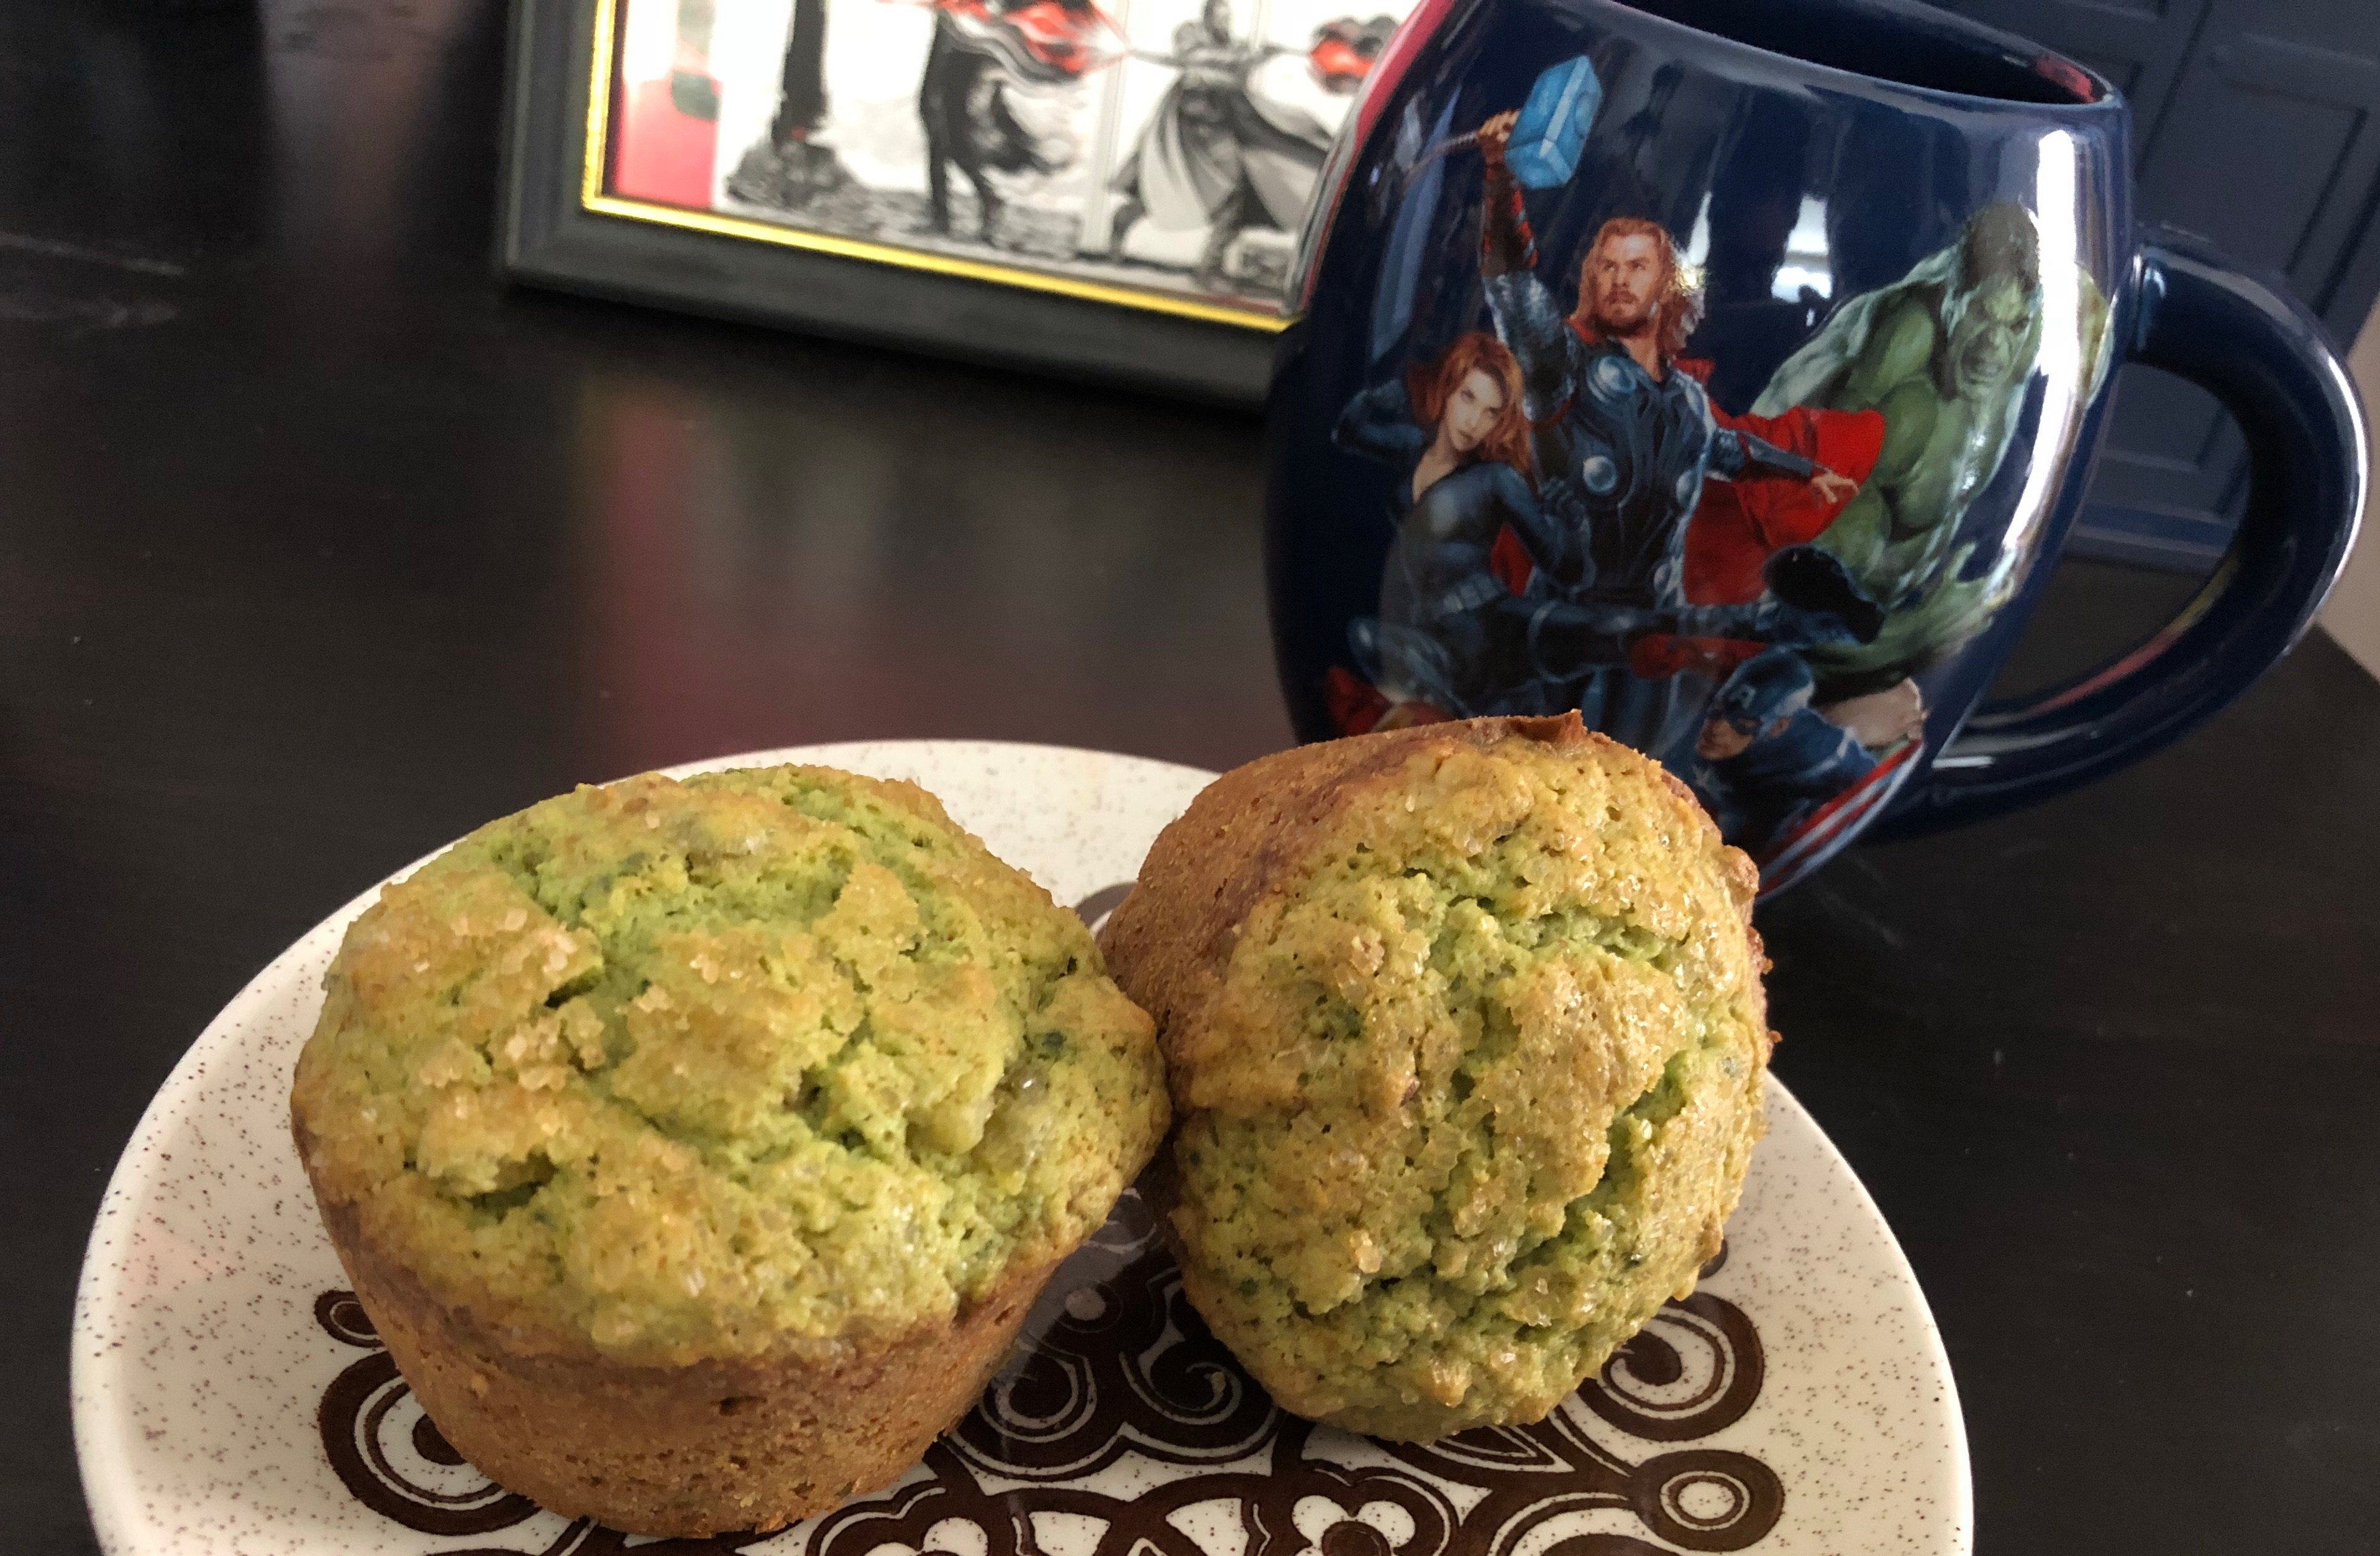
Decorate. This is the part where I lightly ef up tempering my white chocolate. I’ve successfully tempered chocolate once before for my Florentines, but this day of baking was all about learning how past success does not in any way indicate present success. I broke my Ghiradelli white chocolate baking bars, setting aside a 3rd to finish the temper and an 18th for my face. Nom nom nom. I then set up my bain-marie on the stove with my pot of water and set my glass bowl on top. To temper white chocolate, according to my deep research into one article, you need to bring the white chocolate up to 110° slowly. I dropped my chocolate in the glass bowl and it shot right up to 180°. It did not pass go, nor did it collect $200. Bringing the water up to a boil with the bowl on top heated up the glass of the bowl which melted my chocolate and destroyed the temper. Whoops! Live/learn. At least it still tasted like white chocolate.

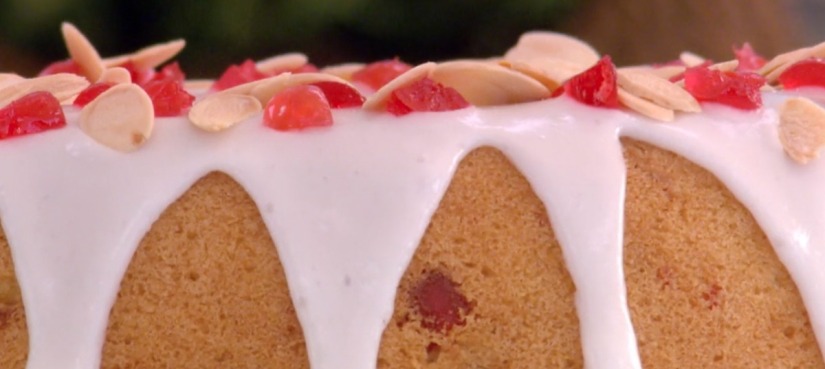
I then commenced dipping the singed side of the biscotti in the chocolate, covering my sins, and finished them with a sprinkling of Demerara. I think they ended up pretty classy looking if I may say so myself.

BDB Biscotti Luke Cage
Sweet Christmas, those biscotti look delicious!

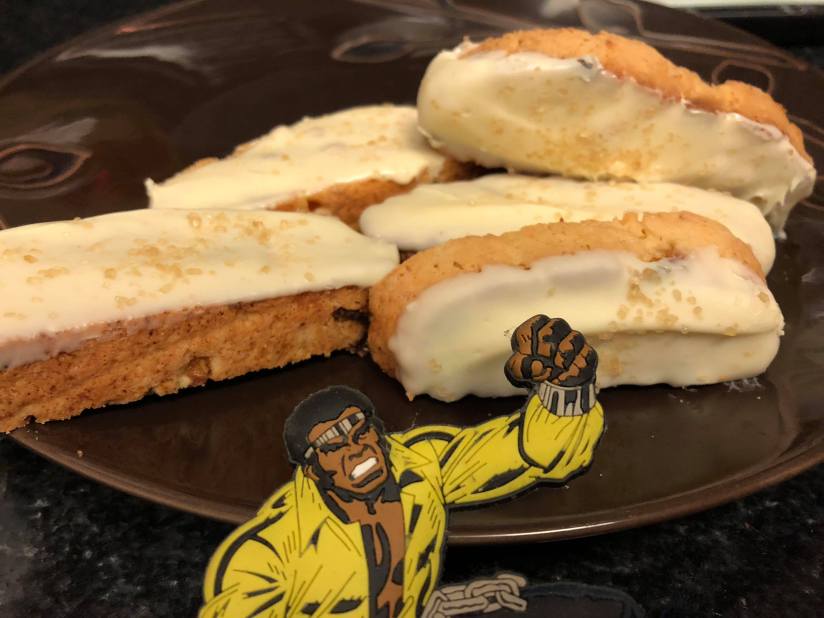
The result?! Even with the blackened cashews and distempered chocolate, this recipe is a keeper. The cookie recipe, with the apricots and cashews, is not overly sweet and with the white chocolate, it is decadent and sophisticated, just like Mrs. B. I even got the highest potluck compliment there is – someone asking for my recipe! She was taking Italian language classes and her turn for bringing in snack was coming up and she figured biscotti would be just the thing! Italian lessons with snack time? Sign me up! I would totally defeat all other snack bringers…

32085088_10104427237337837_8728932451096723456_n
My dessert is the first on the table, totally intimmidating all comers!

Apricot and Cashew Biscotti

Adapted from Real Simple – Almond Biscotti

Ingredients

2 3/4 c all-purpose flour

1 1/2 tsp baking powder

1/2 tsp salt

3/4 c granulated sugar

1/2 c demerara sugar, plus more for decoration

1/2 c butter melted

2 tsp almond extract

3 large eggs

3/4 c chopped dried apricots

3/4 c chopped cashews

12 oz of white chocolate

Directions 

  1. Dry Mixture. Measure your flour, baking powder and salt into a medium bowl and whisk.
  2. Wet Mixture. In your large, main bowl, add your sugars and your butter. Beat using a hand-mixer, and then continue beating as you add your eggs one at a time.
  3. Combine. Add your dry mix, apricots, and cashews to your wet mix and blend just until all the flour is incorporated.
  4. Chill. Fridge your dough for 30 minutes to an hour to firm it up.
  5. Get prepped. Preheat your oven to 350 ° F and cover a baking sheet with parchment paper.
  6. Mold your biscotti. Split your dough into to halves and form two logs, 12” by 2,” on your baking sheet.
  7. First bake. Bake your logs for 25-30 minutes until it firm and your edges are just golden.
  8. Cut. Cool your biscotti on your cooling rack for 15 minutes, then cut your biscotti into half inch slices and return the slices to the baking sheet.
  9. Second bake. Bake your biscotti for ten minutes, then pull out the end pieces and flip the rest. Bake for 8-12 more minutes, watching your cashews closely so they don’t burn.
  10. Decorate. Melt your white chocolate. Dip one side of your biscotti into the chocolate and then sprinkle with demerara sugar. Allow your chocolate to harden, then serve with coffee.
Bread, Technical Bake

Technical Bake: Paul Hollywood’s Ciabatta

The Brief – “Be Patient”

BDB Masterclass Ciabatta
Gingham makes all bakes look glam. Paul Hollywood’s Ciabatta from the Masterclass episode.

Series 5 (American Season 1), Episode 3. Before the sacred and ceremonial dismissing of the judges, Mel calls upon Mr. Hollywood as the “voice of bread” to give the humble bakers some words of advice and encouragement before their bread week Technical Bake. He gets an uncharacteristically blank expression and in a flat voice says, “Be patient.” Seems innocuous enough, but these words would come to plague the bakers, inducing paranoia and bouts of madness, as they rend their aprons and cry to the heavens, “How patient?”

After dropping that ticking time bomb, Paul “Watch the Bread Burn” Hollywood and his accomplice, Mary “Yeast Side Tilly” Berry, leave the tent so Sue can deliver the brief. The bakers have three hours to make four ciabatta loaves, with crisp, floury surfaces, and large, visible air holes on the inside. I’m going to give myself three hours and nine minutes to compensate for my conventional, non-fan oven. (For details, read the “WTFan??!!” section of my Merry Berry Cherry Cake article.)

This is my first Paul Hollywood bake, but I’m not going to let him intimidate me. I know Paul Hollywood, “The Mahogany Tiger” as Sue calls him, is known for taking bakers out at the knees upon hearing their paltry bake plans, and during bread week he is at his peak pomposity. In this very episode during the Signature Bake, he emasculates Richard entirely for uttering the words “American pumpernickel.” “There is only one pumpernickel and that comes from Germany” – a swipe of his claws and Richard is half as tall, blood and treacle everywhere. I have nothing to be afraid of, however, because he laid all of his methods for an impeccable ciabatta out in the Great British Baking Show: Master Class, S1:E2, from which I pulled this recipe and Paul Hollywood lives in the TV where his cutting comments can’t deflate my fragile ego.

The Shopping List

  • A stand mixer. Yes, I knew I was going to end up getting a KitchenAid stand mixer for this project, but I had no idea it would be so soon. Frankly, I’m thrilled. I’ve always wanted one, but being only an occasional home-baker with limited counter space, it seemed like a tremendous luxury. But I’ve been baking more regularly and I have made a sacred vow to the blogesphere to complete all of the #GBBO techinical bakes, and ciabatta is practically impossible to make without one. And, plus, it comes in so many pretty colors! I got this beauty, a KitchenAid Artisan Series, from Amazon and then just sat by the door like an eager puppy until she arrived.
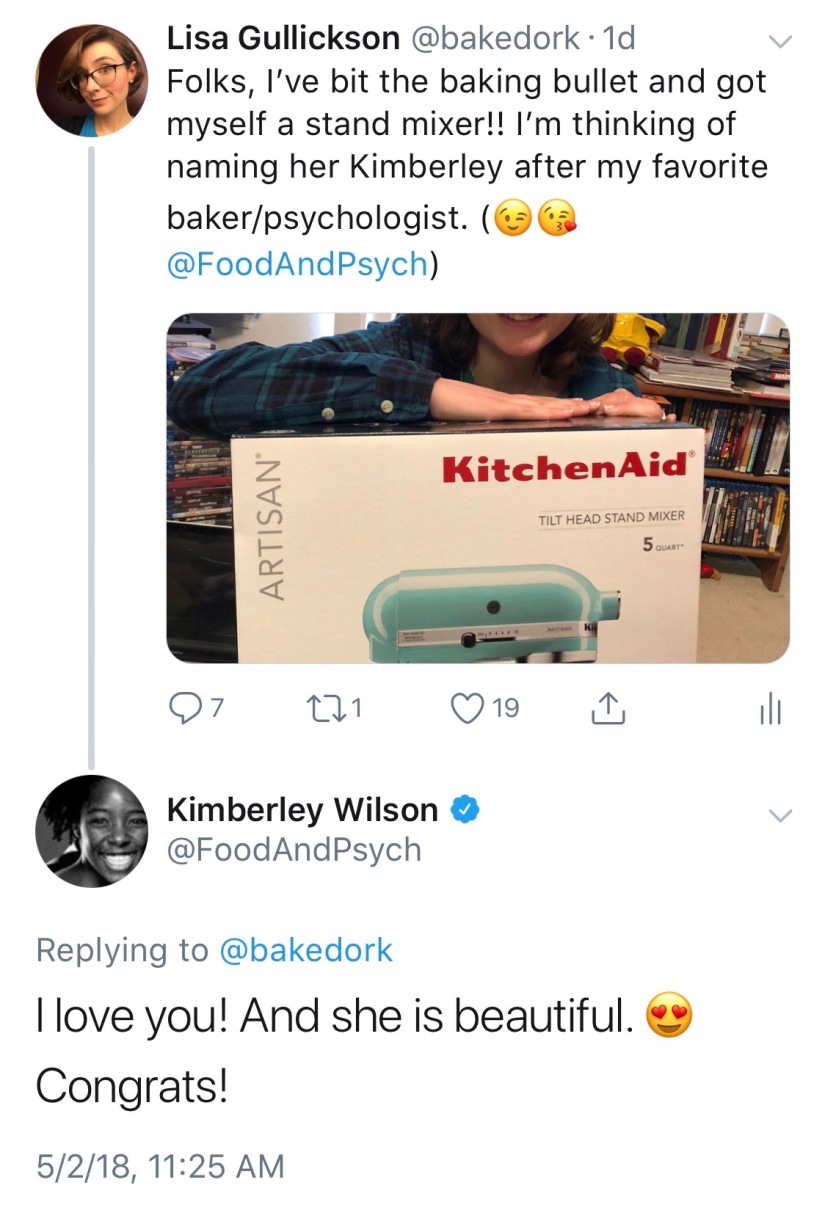
  • And arrive she did in gleaming Aqua Sky! I’ve decided to name her Kimberley after my series Series 4 (Season 2) fave. She has clearly been socialized to be a bubbly, happy person, but a few bakes in it was plain to see she had the cool, calculating heart of a serious competitor. She introduced into my vocabulary the Japanese philosophy of ‘kaizen,’ which is the idea that one should always be striving to be better, and that idea of endless dissatisfaction really resonated with me. I’m smiling through the tears, too, Kimberley. Perfectionists unite!
BDB Kimberley Tweet
My stand mixer has Kimberley Wilson’s blessing! Love you too, Kimberley!!
  • A 3 Litre plastic box. To prove ciabatta and to have the dough dump out in the proper shape, you need a 3-liter plastic box, preferably with a lid. A litre is slightly less than a quart, so I ended up getting this 3-quart container but I wish I had gone with something more like that. The squarer the better, it turns out. Boo! Why did you not show me that the first time, internet!!
  • A dough scraper. Now that I have this, I’m like, why aren’t all knives shaped like this?
  • Strong Flour. I was able to find this at the grocery store, once I realized that it is just “bread flour.” Bread flour differs from all-purpose because of a higher protein content, which means there is more gluten so things get stretchier, and the more stretchier the more breadier, and the more goodier. That’s science.

On Your Marks, Get Set… Bake!

Timing is everything. Back in the judge’s tent, Paul unwraps the mystery behind his enigmatic advice for Mary Berry. The crux of a successful ciabatta is the prove. “Take this dough too early, and the air-holes will be very small, take it too late and they’ll go flat as a pancake.” When Paul Hollywood cuts the bread, he points out the different sized air pockets in the bread saying that the “irregular structure” is a sign of a descent ciabatta.

I knew with my three-hour-and-nine-minute bake time and a lot to prove (Har har!), I would want to maximize the time I had to prove the dough to foster those irregularly sized bubbles, so I did something a bit out of character – I planned ahead. Before starting my timer, I made myself a timetable factoring the rest time and bake time so I would have the longest prove possible. What I came up with was this:

TIMETABLE (189 minutes)

25 Minutes for Assembling Dough

149 Minutes for proving

10 Minutes for cutting

20 Minutes for resting

35 Minutes for Baking

That would give me just 2 hours and 29 minutes for proving. I just prayed to the gods of bread – Sara Lee, Wonder Man, and the knight on the Roman Meal bag – that it would be enough.

Don’t offend the yeast. If I’ve learned anything from watching GBBO, it’s that yeast is a temperamental diva. If you don’t serve her needs or upstage her in any way, she will not show up and do her job. Sweeteners, fillings, temperature, a sidelong glance, all can cause her to flip out and sabotage your bake and you end up with flat, unspectacular bread. That is why, in the Masterclass episode, Master Hollywood recommends keeping the yeast and salt on opposite sides of your mixer bowl. Salt can retard your yeast, so you want to keep them separate for as long as possible so that yeast can feel like the star that she is. I measured my flour into my mixing bowl and put the yeast on one side and the salt on the other, and clicked that bowl into the hot-seat, and I’m ready to get Kimberley’s motor running! That sounds dirty. Lock and load!

BDB Salt Yeast
Mortal enemies.

In the splash zone. “I know it’s supposed to be quite a wet dough, beyond that I am all at sea.” You and I both, Richard, you and I both. I add three-quarters of the water all at once as Paul Hollywood instructed, though while he eyeballed it, I measured out 330 mL of water because I am a literalist. He also specified not to use warm water, because warm water would speed up the rise too much and result in flavorless bread. He didn’t mention anything about cold water, but I’m sure it gives your yeast ennui or something, so I set out my water earlier that morning so I could get exactly room temperature water.

I turned the mixer up to a medium-low speed and the dough hook immediately started forming the flour and water mixture into a dough ball. I then turned up the mixer to medium and added the last quarter (110 mL) of water, which turned out to be the exact opposite of what I was supposed to because Kimberley immediately splashed floury water back in my face. Gotcha, Kimberley, water first, then turn up to medium.

Whiplash. Once you add the water, your dough starts slapping a mad beat on the side of the bowl. You go, daddy-dough! In the Masterclass, Paul Hollywood said the dough would go to the dough-ball, to the slap, and then back into a ball and the whole thing could take about 15 minutes. I set a 15-minute timer when I started the mixer, but the dough just kept slapping. I would stop it to check it with Martha’s “sticky trail” method, sticking the spatula in the dough and bringing it straight out to see if it falls in sheets, which kind of worked, but I was really looking for the dough to get ball-like again. After the 15 minutes was up, I did notice that the dough, which was still cookin’ a mad percussion solo, did stop leaving dough stuck to the metal bowl and was also picking up the glob of dough on the bottom of the bowl, so I assumed that was dough ball enough.

“Positively elastic!” exclaims Mary Berry, her eyes twinkling with delight. I love how, even as a glorious octogenarian, Ms. Barry can still be gob-smacked by bread. Adorable. When I stopped my dough hook, I was a pretty delighted myself. The dough was indeed stretchy just like the T.V. showed me, and it just made the whole process seem very promising.

BDB Positively Elastic
Oh, man! Were you looking at the Arc of the Covenant again?

I then lubed up my three-quart box with olive oil, which is the most filthy thing I’ve ever said. Then it was a matter of getting the sticky, sproingy dough out of the metal bowl into the box. Mr. Hollywood suggests picking up the bread with your olive oily hands, which I did, but the dough insisted on clinging to the bottom of the bowl. Commence the Chaplain routine, but with way more audible swearing. I would lift the dough, and then the dough would lift the bowl. I would try to hold the bowl down with one hand, but then the dough would just stretch and still not let go of the bowl. I don’t know about you, but underneath my adorable, friendly exterior is just red-hot rage magma. I snapped at my poor husband to hold the infernal bowl so I could loosen the bastard dough before I chucked the whole thing out the window. My poor husband, when I am baking he has to be my Mel and my Sue – he’s my extra hands and my sense of perspective. Luckily, he doesn’t have to make the innuendo-laden baking puns, I’ve got that covered. Check out the beginning of the paragraph (So filthy. The BBC would never go for that.).

You think you can make ciabatta? Prove it. It blows my mind that some of the bakers put their boxes in the proving drawers of their oven, despite the sparse recipe specifying that they are to prove the dough at room temperature. The arrogance of it! The recipe was written and edited by Paul Hollywood himself, the B.B.C. took the time to laminate it, it is there to be followed, and yet Martha, Iain and Nancy all put their precious dough into the proving drawers. Sue’s ominous narration forebodes that their loaves will not hold their shape, and so it came to pass.

Granted, they’re in a tent in the middle of Welford Park in Berkshire where it goes from sunshine to full on raining from one moment to the next. They are less subject to room temperature than they are to a fluctuating and fickle tent temperature. Richard, who is a fairly reliable and skilled baker, buckles under the pressure and moves his dough to the proving drawer when the air starts to chill. Kate proves to be the stalwart, sticking to her guns and refusing put her bread-baby in the proving drawer corner.

The crux. I’m not one to watch sports, but I submit there is not a more thrilling minute of television than 10 British bakers waiting for bread to prove. Mel starts stirring the pot, asking Luis and Diane “Who is going to be the first to start doing something, though?” They’re all shuffling their feet and spying on each other when Kate’s hour timer goes off. They all start prepping their boards, flouring their surfaces and getting their baking sheets covered, as they sweat bullets, but it is Jordan, sweet Jordan, who finally cracks. He tips his dough out as Sue observes over his shoulder, “it’s like something out of a John Carpenter film!” Sadly for Jordan, bless his heart, this challenge ends about as happy as a John Carpenter film for him. But he’s not Kurt Russell.

I’m sure if I was trapped in a tent with just me and my swelling dough, I’d be tempted to poke at it a bit. Lucky for me, I’m in the comfort of my own home with my two loves – Brad and our endless Blu-ray collect. We spent the proving time watching Stephen Spielberg’s spin on a literary classic, Hook, about Peter Banning (Robin Williams) whose children are kidnapped by the infamous Captain Hook (Dustin Hoffman). Tinkerbell (Julia Roberts) fetches the bloated lawyer to fly him back to Neverland so she and the Lost Boys can unlock his memory so he realizes he is the real Peter Pan all grown up in time to save his kids. This movie is one of my childhood faves. I find the 90s of it all – the neon colors, the skateboarding, the fat shaming – to be all nostalgic and heartwarming. For me, Hook is fun and poignant reminder to hold onto the whimsy and wonder of childhood as we all slowly turn into middle-aged Robin Williamses. I get a tear every time I see Patches pull the sagging wrinkles of Peter Banning’s face until suddenly his eyes light up – “There you are, Peter!” (Sniff.) Brad says he loves that I love it.

It’s Kate, our “wood nymph with the body of Ryan Gosling,” who epitomizes Hollywood’s “be patient” mantra. It’s poetic that Sue is there for the first tip and the last tip, and as Kate’s voluminous dough lets go of its mold, Sue exclaims as if from the bottom of her very soul, “Ooh! That is bubblicious, girl!” which is something I wish I heard more often.

Get tipsy. At about 143 minutes of proving (isn’t it cute how I used “about” when I actually mean “exactly?”), my dough has grown clear to the lid of my container. Paul did mention that if the bread over-proved it would lose its integrity, so I figured it was time to tip out. I covered my counter with flour and polenta to contend with the stickiness. Chetna nearly had a dough-through-the-window moment when she was trying to handle her dough because she was using oil.

BDB The Blob
The Blob.

Mr. Hollywood recommends being extraordinarily gentle when you tip out your dough. In fact, handle your dough as little as possible, so as not to knock the air holes out. With this tidbit of knowledge, it is slightly heartbreaking watching our friend-bakers stretching and pawing the life out of their dough. Poor Diana is pressing her dough into little ovals, and you can see in her sweet grandma face that she knows something is amiss.

BDB Raw Loaves
Shhhh! They’re resting!

In the Masterclass, Mr. Hollywood perfectly demonstrates how to cut dough to maintain peak bubbliciousness. When your dough is blobbed out onto your flour and semolina, and you have a tray with parchment and semolina waiting, you simply cut your bread straight down with the dough cutter, then with your fingers, tip your bread onto the cutter with the cut side up and then in one swift motion stretch and place your bread on the tray. You want to have the cut part on top to give the bread its signature two lines on the top. That’s it, no shaping or smooshing necessary. I then rested my raw loaves for the prescribed twenty minutes, then threw my tray into the 450° oven for 26 minutes, and when I checked it had browned and looked an awful lot like ciabatta bread. I have to admit, I was totally surprised by that. I gave it a little knock-knock to see if it sounded hollow, and it indeed did.

BDB Baked Loaves
Hello, my beautiful babies!

Did I make time? Third time must be a charm because for the first time I actually made the bake in the time allotted. In fact, I had time to spare! What is the sound of one hand high fiving? (Whoosh?)

The Gingham Altar

It is not enough that the ciabatta loaves are cooked and look like bread, they must be the bread that crushes and humiliates other bread. The bread has to be the platonic ideal of bread. And while I don’t have Paul “Voice of Bread” Hollywood and Mary “Ogler of Bread” Berry, I do have myself and my husband to judge this ciabatta against the criterion laid out by the man himself. I solemnly swear to judge myself harshly. I have plenty of practice at that.

Would it make the cut? Paul Hollywood sliced like a bread knife when it came to his anonymous judging of the humble ciabatta laid before him. He starts with Chetna’s on the end, “We’re actually looking for a ciabatta rather than a pita.” Daaaayum! That is some serious bread shade! It is rather Sherlock Holmes-ian the way Paul Hollywood can pick up an anonymous bread and accurately diagnose at a glance all of the pitfalls the baker made – “This one was forced in heat,” “This one has been handled,” “yeah, it’s olive oil,” and so on.

Shot of Chetna's Pathetic Pita
Shot of Chetna’s pathetic pita.

Hollywood made it clear that he was looking for a tall round loaf, with a floury, tough surface, and an irregular crumb structure with multi-sized bubbles on the inside. In last place was poor Jordan, who not only was the first to tip but also covered his ciabatta in oil rather than flour. Tsk tsk. In 9th and 8th was Iain and Chetna had both served up “pitas.” Martha, who was slightly under proved, was third, Luis was second, and Kate “Wood Nymph Gosling” with her nerves of steel was first. Not letting a person have a perfect loaf of bread, Hollywood mentioned that it may have been over handled, but it was the closest to a perfect ciabatta.

My ciabatta did have the signature roundness and when I cut into it I was relieved to see all of the beautiful bubbles that have been preserved in my bread. The flavor was delicious and the crust was chewy. I think the only downside is that maybe my ciabatta was a bit darker than golden. I might fall somewhere around Norman and Martha. They had very good bakes, but both of their breads were slightly under-proved. I dare say, my bread had the proper prove though it had a little extra color under that floury surface. I think I would put myself solidly in fourth.

BDB first cut
Check out my sweet bubbs!

All-in-all, I think ciabatta is a pretty good beginner bread. It doesn’t take any special kneading skills or any fancy shaping. In fact, the number one thing to do with ciabatta bread is do nothing. And I love doing nothing. It’s one of my preferred things to do. Rufio! Rufio! RU-FI-OOOOOOO!

BDB glamor bread
Ciabatta!

Recipe: Paul Hollywood’s Ciabatta

Ingredients

500 g of strong (bread) flour

10 g of fast action yeast

10 g of salt

440 ml of water

Olive Oil

Semolina flour

Directions

  1. Measure dry ingredients. In your mixer bowl, measure off your flour, yeast, and salt. Put your yeast on one side of the bowl and salt on the other.
  2. Add water. Add 3/4 of the water. Mix with the dough hook until a ball forms. Add a little more water at a time as you speed up the mixer until the dough starts slapping the bowl. The dough will be in the mixer for up to 15 minutes.
  3. Oil your box. Oil your 3 Litre square tub with olive oil, then move the dough to the container with your oily hands. Clip the lid and prove to the top at room temperature for 1-2 hours until your dough is up to the lid.
  4. Get everything set. Preheat the oven to 220° C Fan (420° F Fan/450° F conventional) and line your baking tray with parchment paper. Generously flour your bench with your bread flour and semolina.
  5. Cut your dough. Gently tip out your dough. Put semolina on top of your dough and on the tray. With your dough cutter, cut a quarter of your dough off firmly in a downward motion then tip and lift onto your tray so the cut stays on top. Use this method to create four loaves.
  6. Let it rest. Allow your dough to rest uncovered for 20 minutes.
  7. Bake it. Bake for 20-25 minutes (26-34 minutes conventional) until a crispy golden brown.
Muffins, Signature Bake

Signature Bake: Cranberry Walnut Matcha Muffins

This past Sunday, April 22nd, 13 of my heroes from the Great British Bake Off ran the London Marathon. A tremendous and impossible feat in my eyes – I can barely run 26.2 seconds, so 26.2 miles is superhuman to me and I am humbled. I’m much more of a 26.2-minutes-on-the-elliptical kinda gal. I don’t want to run with one foot unless my other foot is being gently cradled and carried in a circle. Literally, my work out routine starts and ends with me re-watching part of an episode of #GBBO while sweating out on the most gentle cardio-equipment. Hopefully, my cardiovascular system doesn’t realize I’m watching six British people make suet puddings whilst I exercise. I feel like it would somehow take my over-all health less seriously (“I’m sorry, she’s watching what? While I’m pumping away like an idiot? Nope. Shut it down. Shut it all down.” – my heart). While I enjoyed the marathon vicariously through their twitter feeds, it did serve as a reminder that if you are a home baker and 80% of your diet is white flour, you should probably learn to outrun it.

You can see in the tweet above the #bakersdozen looking fab before their run – (Back to front) Alvin, Ian (Or as I call him, ‘Other Mat’), Michael, Mat (‘Other Ian’), Tom in a hat, Sexy Selasi, Chetna, Kate, Richard, Jane with her eyes closed, Frances, Beca and Enwezor. As a whole, they were running for Great Ormand Street Hospital Children’s Charity, which is a wonderfully worthy cause.

Frances, Selasi and Enwezor also ran for other deserving organizations. Frances was running for Macmillan Cancer Support, Selasi was running for World Vision, and Enwezor was running for the Cystic Fibrosis Trust. You go, you magnificent marathoners!!

From Marathons To Muffins

Meanwhile, while the #bakersdozen were being their best fitness selves, I was baking muffins – but they’re matcha muffins, so they’re green. That makes them healthy, right?

After finishing my second technical bake, Mary Berry’s Florentines, I had all of these fixings left over – chopped walnuts, slivered almonds, tons of mixed peel, dried cranberries, and Demerara sugar – all just crying out “bake me!!!” All of those elements could add great taste and texture to many bakes, but I got it in my head that a spongy sweet muffin would be just the thing. Now, the matcha element was just a stroke of genius.

We know from Series 7, Episode 1, that Ms. Mary Berry is not the biggest fan of matcha powder. Poor Michael used it in his mirror glaze showstopper, and she dismissed it as “grassy,” but I’ve found the “grassiness” to be less of a flaw and more of a feature. The earthy, green tea powder goes perfectly with the creaminess of dairy and a touch of sweetness. The fascinating flavor just needs to be presented in a way that speaks to you. For me, it was in the form of a delicious, piping hot matcha cookie served at the Alamo Drafthouse as part of the special menu for the Wes Anderson animated flick, Isle of Dogs. These cookies where so flipping delicious that the inspired a mission. Matcha officially has to be in everything. I started voting with my dollars, jamming on matcha lattes, boba teas, matcha baked goods, and just straight green tea like it was going to cure me of something (And who knows – maybe it will!). Now I had to complete the circle and do a matcha bake of my own – Cranberry, Nutty, Peel-y Matcha Muffins! Yeah, the name needs work…

Now, there are many “basic muffin” recipes floating around the internets, but I had to go with the America’s favorite homemaking felon, Martha Stewart. She may fib a little about insider trading, but her recipes don’t lie! They can be a fussy at times and very particular, but she is a woman who knows time while spent, if you know what I mean (in prison). Her “Better than Basic Muffins” are one of her more simple recipes, consistently good, and super adaptable to whatever muffin your heart desires – including my Cran-Matcha-Walnut-Zesty Muffins. Nope, name still no good…

On Your Marks, Get Set… Bake!

Handle your nuts. There is a little prep with this one, but it’s all worth it. First I whiz up my blanched slivered almond in my little blender and put them through a medium sieve to make a 1/2 cup of ground almonds. Then I toast my chopped walnuts. You can put the walnuts in as they are, but I find that they don’t add much flavor un-toasted. What good are nuts if you can’t taste them, am I right?

(My mom will be so relieved when I make something without nuts in it.)

The most annoying step ever. I hate buttering and flouring muffin tins. They should just make butter in the shape of a muffin tin and invent a flour blower, but no you have to mush a half stick of butter into each little divot until it’s entirely misshapen then put a spoonful of flour in each hole and then shake it around like a mad woman dumping white powder all over myself and the floor so that my kitchen looks like outtakes from Wolf of Wall Street: The Martha Stewart Story. Now that I think about it, I could’ve just used a sieve and dusted it on… that is probably a way better strat. I never stop learning.

Whisk me away! Melt the stick and a half of butter, then transfer it to a small bowl. Whisk together all of the wet ingredients – eggs, milk (half & half is what I had on hand), almond extract – and then add your matcha power. I suppose I could’ve also done the matcha in the dry ingredients, but it is so fine, and this guarantees that it is evenly distributed throughout your mixture. Plus, look what a pretty green it makes (or you can think ‘Exorcist’ but that is much less appetizing).

img_0274-e1524591881639.jpg
Don’t touch it, unless you want to be a part of the TMNT.

Muffin Vesuvius. Sieve together your dry ingredients – flour, ground almonds, baking powder, granulated sugar, and salt – into a large bowl. Martha recommends to dig a well into your dry ingredients and then pouring your wet mixture into the crater, and it’s best to do what Martha says (she’ll shiv you). Then gently mix your ingredients together just until all of the flour is soaked up. You’ll already see bubbles forming from the baking powder and you don’t want to squish those. Carefully fold in all of those wonderful Florentine fixin’s – your toasted walnuts, peel, and cranberries – until they are well distributed.

img_0276
For younger, smoother skin!

Scooping time! Scoop your green batter into your muffin tin until each cup is about 2/3s full and no more. I know, you’re a glutton like me, and more batter means more muffin, but they are impossible to get out of the tin when there is too much of a muffin top and you end up breaking your muffin to bits. Top your batter with a pinch of the Demerara sugar. This turns out to be the perfect finishing touch.

img_0232.jpg
Soon enough, my pretties!

Get baked and have a lie down. Bake in a 375° F oven for 15-20 minutes, and check your muffins using a tooth pick. If the toothpick comes out clean, they’re baked!

Martha decrees that after you take your muffins out of the oven, they are to be loosened and laid on their side to cool in their tin.

img_0277.jpg
Shhhhh! They’re sleeping!

The result?! These Matcha Walnut Cranberry Mixed Peel Party Muffins are a hit in the Gullickson household. The matcha and the citrus peel perfectly compliment each other for a very vibrant, herby flavor that is not overpowering. The zing of the cranberries and texture of the walnuts just taste like breakfast to me – so good. The best part, I think, is the crispy Demerara sugar on the top. It just sort of melts in the oven and cracks over the the muffin, so the tops look golden and appetizing. They’re pretty little green muffins! But what to call them?

img_0244
I don’t like the way the Hulk is eyeing my muffin!

Recipe: Cranberry and Walnut Matcha Muffins (With Mixed Peel)

Adapted from Martha Stewart’s Better-Than-Basic Muffins

Ingredients

3/4 C (1 1/2 Sticks) of Butter Melted, plus more for tin

2 Large Eggs

1/2 C Half & Half

1/2 Tsp Almond Extract

1 Tbs Matcha Powder

1 1/2 C All-Purpose Flour, plus more for tin

1/2 C Ground Almonds

2 Tsp Baking Powder

3/4 C Granulated Sugar

1/2 Tsp Salt

1/2 C Chopped and Toasted Walnuts

1/4 C Lemon Diced Peel

1/4 C Orange Diced Peel

1/2 C Dried Julienned Cranberries

2 Tbs Demerara Sugar


  1. Preheat and Prep. Preheat your oven to 375° F, then butter and flour your standard muffin tin.


  1. Whisk wet ingredients and matcha. In a small bowl, whisk together your butter, eggs, half & half, and almond extract. Then whisk in your tablespoon of matcha powder.


  1. Whisk together dry ingredients. In a large bowl, sift together your flour, ground almonds, baking powder, granulated sugar, and salt.


  1. Combine the wet and dry. Fold your wet mixture into your dry until they are just combined.


  1. Mix in your Fixin’s. Gently fold in your walnuts, diced peel and cranberries.


  1. Fill your tin and add Demerara sugar. Scoop your batter into your tin until each of the wells is 2/3 filled, then sprinkle the batter in each well with a pinch of Demerara sugar.


  1. Bake. Bake your muffins for 15-20 minutes until you can poke them with a toothpick and they come out clean. The tops should be well risen and slightly golden green.


  1. Cool. As soon as you can handle, turn each of the muffins on their side in the tin to cool.
scones, Signature Bake

Signature Bake: Mary Berry Cherry Cake Scones

After I tackled my first Great British Bake Off Technical Challenge, Mary Berry’s Cherry Cake, I was totally chuffed and left with a half a tub of leftover glacé cherries. Generally, when I have left over ingredients that I don’t use on a regular basis, I just leave them to commune with my ever-graying dried herbs and spices until I move or there is some kind of fire. But I imagine that these cherries would harden into ruby red stones, and who needs Thanos knocking around their cupboard trying to complete his gauntlet (#InfinityWar, anyone?)? Glacé cherries are yummy, so I briefly considered just eating them whole, but I did not want to discover what these syrupy sweet wax-adjacent fruits would do to my system. The only other choice was to use them. How? Bake them into scones!

I’ve been on a serious scone baking kick for a few weeks now and I find they are such a fun bake. You get the satisfaction of bringing dough together with your hands and shaping it without the challenge of arduous kneading or the patience of proving. My husband, who was raised by a proper English lady, and my father-in-law, who is the spouse of that proper English lady, love to remind me that what I make are not “proper English scones.” Proper English scones are plain, fluffy white biscuits to be eaten with jam and Devonshire cream. They are not to have any added flavor or fruit, except for maaaaaybe currents. My mother-in-law, who is that proper English lady, only says kind things about my scones, because actual British people are nice. (I’ve had her scones with jam and Devonshire cream, and they are amazing.)

BDB Proper English Scone
Proper English Scone, made by my Mother-In-Law, a proper English lady.

I was inspired to make my own scones by what may be the antithesis of the “proper English scone,” the Starbuck Scone. Like everyone in America, Brad and I live right across the street from a Starbucks, and down the street from a Starbucks, and caddy corner from a Starbucks. We had gotten in the habit of getting Starbucks scones nearly every morning. Brad would go for the cranberry orange scone, which is life-raft like in size and flavor profile, and I would go for the petit vanilla bean because who would not want a sponge if it is 120 calories and covered in icing sugar? They were convenient, carb-y and I had not yet discovered how delicious the homemade scone could be.

When it finally dawned on me that we could save a few bucks if I just took an afternoon to knock out a batch of scones, I started scrounging the internet for a recipe that seemed easy enough, didn’t have too many ingredients, and did not have enough sugar to qualify as a triangular cake, and I came upon this recipe on Epicurious from Bon Appetit, November 1998. It’s 4 out of 4 tiny red forks and a 96% “Make it Again” rating, and the tiny red forks do not lie – it’s a solid recipe. The first time I made this recipe, I made it pretty much as written except I subbed whipping cream and apple cider vinegar for the buttermilk and made the scones smaller so I got 16 out of the recipe instead of eight gargantuan ones. They turned out great, perfect for dipping in tea or coffee and they actually tasted way better than the Starbucks cranberry orange pontoon. I’ve since made the recipe in a couple of different variations including lemon, orange marmalade thumbprint, blueberry lemon thumbprint, and now these – my Mary Berry Cherry Cake Scones.

BDB Orange Marmalade Thumbprint Scones
Some of my orange marmalade thumbprint scones. I wouldn’t kick those out of bed.

 On Your Mark, Get Set, Bake!

BDB Sue Baaaaake

 Rooty tooty, prep your fruity. I prepped the cherries exactly as I did in for the cherry cake – by cutting them into quarters, rinsing off the syrup, drying in a kitchen towel, and borrowing a tablespoon of my flour and coating them. This time I actually did a double rinse – rinsing them before and after the quartering, and that did make the cherries less sticky to handle while cutting. Then I zested and juiced my lemons. I like zesting my citrus on the large side of my box grater instead of using the small side of the grater or a microplane for my scones. I know what you’re thinking – I’m a maverick! But I like finding the waxy pieces of citrusy zest in my scone. It adds to the texture, I think.

Sorry, buttermilk. After juicing, I took a tablespoon of my lemon juice and put it in the bottom of my liquid measuring cup and filled the rest with whipping cream up to one cup. Don’t stir it! Then the cream just thickens like sour cream and it’s harder to work with. I always sub out buttermilk for whipping cream plus an acid because, frankly, I find buttermilk kinda gross and not the kind of leftover ingredient I want hanging out in my fridge. It’s sour and weird, and how do you know when it is bad? Whipping cream is a lovely thing to find in your fridge. You have a wonderful excuse to pour whipping cream directly into your tea – decadent, I know, but you got to use up this leftover cream! Or I suppose you could be like The Dude and have a super rich white Russian. No one has ever looked at leftover buttermilk and felt hopeful. I apologize to all of the buttercows – it’s not you, it’s me.

BDB prepped scone ingredients
Ingredients in waiting. A still life. (Um, are all photographs technically still lifes?)

Ground almonds, why not? Along with leftover glacé cherries, I had leftover blanched almond slivers from making the ground almonds for the cake, so I just blitzed enough to make a half-cup of ground almonds, which I swap out for a half a cup of the flour. I sieved the ground almonds through a medium sieve before I sieved them in with the rest of my dry ingredients.

Butterfingers. Incorporating your butter cubes is about the funnest part of this whole recipe. You drop the cold butter cubes into the dry ingredients and then you go in with your pinchy-crab fingers and just pinch and rub the butter into the flour until practically all of your butter is one with the flour and you end up with what looks like bread crumbs or a course meal. I have a pastry cutter, but I find it to be less efficient and satisfying than just getting in there with your hands. I’m like Paul Hollywood in that way, I like to get handsy with my dough. (But I am unlike Paul Hollywood in that I eat my cake with a fork not my hands, because I am a dignified person.) After you get to breadcrumb stage, mix in your prepped cherries.

BDB Scone Crumbs
Dry ingredients and butter, inc.

Mixing and cutting dough. I give my lemon and cream mixture a quick stir before I add it a little bit at a time to the bowl. It’s the reaction of the “buttermilk” and baking powder and soda that gives the scone it’s little bit of rise, like a quick bread. Once all of the liquid is in, give the dough a little bit of a knead so that it comes together into a ball. I just knead it right in the big bowl. Why bother getting my counters dirty? Give the ball a light dusting of flour, then split it in two and give each of the smaller balls a light dusting so that they’re easier to handle. It’s always easier to handle balls after they’ve been powdered.

BDB Loreai Gif

I transfer my powdery balls to a baking sheet that’s been lined with parchment paper and I pat them into round 3/4 inch thick disks. I’ve done it with a rolling pin, but I don’t think it makes that much of a difference. Then I cut each of those disks into eight even pieces, pizza style, and distribute those on your baking sheet so they’re about an inch apart because they will grow in the oven.

BDB Cutting Scones
A picture of my scone dough all cut out and a little bit of my finger in the upper lefthand corner. #blogpro

Adorn them golden triangles! While my scones were getting all puffy and golden in the oven, I toasted my almonds and cut my decorative cherries into eighths. When my scones were out, I made the lemon icing. It is the exact same two-ingredient icing as the cherry cake. You just add the lemon juice to the icing sugar a smidge at a time until the icing sugar just lets go of your whisk. You don’t want to add too much liquid, because you want the icing to keep its shape on the scone.

Once the scones have cooled for ten minutes on the baking sheet, I start decorating. I wanted to channel Nancy’s winning cherry cake for my icing job and went for a tight zig-zag. I would ice the scones one at a time and then stick on my cherries and almonds. I found I had to put dots of extra icing to get the cherries and almonds to actually stick, and while they turned out really cute, I got pretty fed up with the fiddlyness of sticking things on individually. When I make these again, I’m totally just going to make twice as much icing and just throw the toppings on. Not as cute, but way quicker, and who doesn’t want more icing?

BDB Nancys Winning Cherry Cake
Nancy’s winning Cherry Cake, which earned a “perfect nuts” from Mary Berry!
BDB Cherry Scones Decorated
How does my ice job look next to Nancy’s? (Be kind!)

The result?! These are my favorite batch of scones yet. The ground almonds add a little more cakeyness to the scone, which makes them perfect for dipping and soaking up your morning tea or coffee. The tartness of the lemon icing and the sweetness of the cherries compliment each other perfectly. And look how darling they are! They are sweet, adorable, and a little bit tart, just like Mary Berry herself!

mary berry smile GIF by BBC-source

Recipe: Mary Berry Cherry Cake Scones

Adapted a recipe from Bon Appetit, November 1998.

BDB Mary Berry Cherry Cake Scone
My scone glamour shot. Work your angles, scones! Get it? Because they’re triangles.

 Ingredients

3/4 cups glacé cherries plus 7 for decoration

1 cup (minus a table spoon) of heavy whipping cream

Juice of 2 lemons

2 1/2 cups of all-purpose flour, plus extra for dusting

1/2 cup ground almonds

1/3 cup sugar

2 1/2 teaspoons baking powder

1 teaspoon salt

1/2 teaspoon baking soda

Zest of two lemons

3/4 cups (1 1/2 sticks) chilled butter

1 1/2 cup icing sugar

3 tablespoons of flaked almonds

Directions

  1. Preheat and prepare the pan. Preheat your oven to 400° F and line your sheet pan with parchment paper.
  2. Prepare the cherries and cream. Quarter then rinse your 3/4 cups of cherries, then borrow a tablespoon from your flour to coat. Put a tablespoon of lemon juice in the bottom of your liquid measuring cup then fill to one cup with cream. Don’t stir.
  3. Mix dry ingredients. In a big bowl, sift your flour, ground almonds, sugar, baking powder, salt, and baking soda. Then add your zest.
  4. Incorporate your butter and add cherries. Cut your butter into cubes and drop the cubes into your dry ingredients. With your fingertips, rub the butter into the dry ingredients until it looks bread crumby, then mix in the cherries.
  5. Add liquid and make the dough. Give your lemon juice and cream a quick stir, then add it a little bit at a time to your bowl, tossing the contents around with a fork. Once all of the liquid is in, knead the mixture together just until you can make it into a ball.
  6. Divide the dough into triangles. Cut the dough in half and cover each half lightly with flour. Make each half into a 3/4 inch thick disk on your sheet pan. Cut each disk across the diameter into eight triangles. Arrange the triangles into the sheet pan so they have some room between them on the sheet pan.
  7. Bake and toast your almonds. Place the sheet pan in the center oven and bake for about 17 minutes until your scones are a pale golden brown. While your scones are baking, toast your almonds in a dry pan on medium heat. Set aside to cool.
  8. Cool and get cherries ready to decorate. Once your scones are done, let them cool on the pan for 10 minutes, then move them to a cooling rack. While your scones are cooling, slice remaining cherries into eighths.
  9. Make icing. Put your icing sugar into a medium bowl. Whisk in your lemon juice tablespoon at a time until it makes an icing just thick enough drizzle.
  10. Decorate! Ice your scones, then top with almonds and cherry eighths.
Cake, Technical Bake

Technical Bake: Mary Berry’s Cherry Cake

It’s Time to Get Technical!

Merry Berry's Cherry Cake
I can sure take a screen cap, can’t I? From the Masterclass Episode.

I used to consider myself a fairly proficient home baker. My favorite part of getting a party invitation has always been considering what kind of delectable baked treat I can make to impress my friends and distract them from how socially awkward I am. But I’ve always relegated myself to drop cookies or cupcakes, putting more thought into marginally inventive flavor combinations rather than fiddly decorations. I also have generally stuck to recipes that use all-purpose flour, because I feared having barely used sacks of aging flour just hanging out getting stale and taking up cupboard space. I’ve never done pastry, I’ve never done a yeasted bread, and I was content with that. And then I watched The Great British Bake Off.

Since the The Great British Bake Off bubbled up on my Netflix homescreen, under the American title of The Great British Baking Show, I’ve watched and re-watched the four available seasons much to the frustration of the Netflix algorithm, I’m sure. (“Again, Lisa? But I make such brilliant suggestions!”) Watching these “home bakers” produce an insane variety of impressive bakes under such tremendous pressure blew my mind. I was suddenly motivated to whack something in the oven, slap some gluten into dough, and hold a meringue over my head!

But one doesn’t simply knock out a brilliant showstopper like Christine’s shortbread Bavarian Clock Tower or Nadiya’s chocolate peacock after making only drop cookies and cupcakes. I need to diversify my baking skills and work myself up to Star Baker of my own kitchen. That’s how I got the idea of working my way through the GBBO Technical Bakes one by one, starting with Mary Berry’s Cherry Cake.

Why this cake to pop my technical bake cherry? (Ooh! Sue would be chuffed with that one!) Because it is the first technical bake for Nancy, Richard, Martha, Chetna and the other bakers in Episode 1 of Series 5, which for those of us across the pond is Season 1. My parameters on myself will be very different than those competitors, in that I’m giving myself literally every advantage. First and foremost, I’m going to have the complete recipe. I’m aspiring to making something worthy of the Gingham Altar of The Great British Bake Off, not Netflix’s American baking competition show Nailed It! (As much as I love comedian/host Nicole Byer, I’m morally opposed to that show on so many levels.) I’m also going to aspire to keep to the time and I’ll report honestly if I made the bake in time or not, but I’m going to keep baking the damn thing until it’s edible. I’m not in this to create food waste, though I know I’ll probably end up rage-binning a fail or two. (Like Iain’s Baked Alaska! Heartbreak!) I’m also going to re-watch the eps and take copious notes so hopefully I can avoid the pitfalls stumbled upon by the contestants who did these challenges in earnest.

The Brief: Mary Berry’s Cherry Cake

bdb topographical cherry cake
Sexy topographical cake shot from the Masterclass episode.

Our queen, Mary Berry, chose this particular cake over all other for the kick-off of season five, “It’s a great British classic, but it’s quite tricky to get right.” It all comes down to the jewels of that baked golden crown, the cherries. They have to be perfectly suspended in the cake and not all gathered at the bottom or off in one spot. Then there is is the lemon icing that needs to be the correct consistency so that it can create gentle drizzles down the side of the light golden brown cake. The bakers have 2 hours. I’ll give myself 2 hours and 11 minutes to make up for my slow, conventional oven, which I’ll get into later.

I pulled the recipe from the Great British Bake Off: Masterclass Series 1: Episode 1 in which Ms. Berry herself walked her humble viewers through this recipe.

Shopping List

Most of the tools and ingredients I either had or could get from my regular grocery store. There were a few items, however, that I had to order online or, in the case of ground almonds, improvise at the last moment.

  • The Food Scale. British recipes call for their dry ingredients to be weighed rather than using graduated cups and spoons. I poked through amazon reviews before landing on this one – the Etekcity Digital Touch Kitchen Scale.
  • The Ring Mold. Mary called for a 23 cm ring mold. I did not want to settle for a bundt pan because I liked the aesthetic of the smooth ring of cake. I ended up getting a 9.75” savarin mold.
  • The Glacé Cherries. I wasn’t sure if a grocery store would carry these on the regular, so I just bought these from amazon.
  • Caster sugar. American grocery stores carry hardly anything beside granulated and powdered white sugar. Caster sugar is a finer sugar without going full powder. I bought this on amazon, though my British friend told me later that she often buys super fine Domino’s sugar for her British baking, which is kept by the coffee and tea.
  • Ground Almonds. For some reason, I thought I would be able to find ground almonds in a sack in the baking aisle of the grocery store. Silly me! I went to three different grocery stores, and while I found almond flour and almonds in all forms, but no ground almonds. I ended up buying blanched silvered almonds and then grinding them in my magic bullet. I ran them through a medium sieve to get the big almond chunks out.
BDB ground almonds
My beautifully ground almonds! Like a sandy beach of yummy ingredientness.

On Your Mark, Get Set… Bake!

BDB Bake

WTFan??!! Watching the show, they would declare oven temp using the term “fan.” And I’m all like, what the F is fan? Some quick googling around revealed that “Fan” refers to turning the fan on in your fancy-pants convection oven. Well, my pants are quite ordinary and the air in my oven is still as a tomb, so what’s an amateur baker to do? The answer is math. Let me get my pencil from behind my ear… oh wait, I’m not Richard!

It turns out that a Fan-assisted, or convection, oven lowers your oven temperature by 25° and decreases your cooking time by a third. There are LOTS of sites that help you convert recipes for a conventional oven into a recipe for a convection oven but us standard oven plebes are on our own. Mary Berry called for “160 Fan” for her Cherry Cake. I converted it from Celsius to Fahrenheit by asking Siri which comes to 320°. I then added the 25° to make up for my lack of Fan. So my bake temp was going to be 345° F. Mary said the bake time was to be around 35 minutes, so I increased the bake time by 33% and got 46 minutes. Boom. Simple! It didn’t take an aerospace engineer after all.

BDB Andrew

Prepare the Cherries. Our fine bakers in the tent were a bit baffled by how, exactly, to prepare the cherries, which was the crux of the entire bake. “Does she mean wash or does she mean cut? Well, I’m going for cut,” Jordan decided. Well, cut he did, chopping those poor cherries into oblivion so that they seemed to dissolve into his cake. Poor Claire and Richard left their cherries far too large so they all sunk to the bottom of the tin.

In the Masterclass episode Mary, revealed the secret of her suspended cherries, which is fourfold – cut, wash, dry, and coat. Paul Hollywood was aghast when Mary instructed him to quarter the 200 grams of sticky cherries, but I rather enjoyed the task. I would just line my little cherries up three like soldiers, then cut them in half, then line up the six halves and cut them again. Only after cutting them did I wash the syrup off, because Mary was very clear that if I washed before I cut the syrup released from the center of the fruit during cutting would be my undoing. After I rinsed them and dried them with a kitchen towel, I borrowed a tablespoon from my 225 g of self-rising flour to coat the cherries.

BDB Prepared Cherries
These cherries are as prepared as they’ll ever be!

All-In-One Method. It doesn’t get much easier than dumping all of the ingredients into a bowl and mixing them together. Mary used a stand mixer in her masterclass, but I don’t have a stand mixer. The fancy Kitchenaid stand mixers are prohibitively expensive and take up valuable kitchen space, but deep down in my little bake-loving heart, I desperately want one. I’m sure I’ll find an excuse in later bakes to take the plunge, but for this bake Norman and Nancy both mixed by hand. Norman’s cake was a little dry, but Nancy’s cake was the winner (Surprise, surprise!) so I figured that how the ingredients came together wasn’t all that important. I just used my hand mixer until the ingredients just came together and then folded in the cherries.

In the lap of the Gods! Once I had all of the batter in the mold and leveled, I whacked my cake in the oven to bake. I tried to clean up my baking mess while I waited, but I couldn’t help but look through the window of my oven every few minutes to see how my little, sweet cherry baby was doing. About ten minutes into the bake, I saw that my cake had risen about an inch above the tin. Catastrophe! My savarin mold wasn’t quite as deep as the molds the bakers in the tent were using, and the self-rising flour was doing its thing. I couldn’t very well fix that cake while it was in the oven, so all I could do was watch it bake and worry.

BDB Martha Worry

I ended up taking out the cake at about 43 minutes, after checking for doneness with a wooden skewer. The bottom may have taken on a bit more color than it would have otherwise, but when I leaned into the take a sniff, Sue’s “very sexy sauna” style, I smelled some sweet, lemony goodness.

BDB cherry cake bottom
I’m baffled by my jaunty angle on this pic as well.

Flipping out. After letting the cake hang out on the counter for 10 minutes, and checking that the warm cake had pulled away from the side of the tin, I flipped my cake out. I could see a few of the cherries had sunk, and were revealing themselves like little embedded rubies, but I could also see some cherries peaking through the side of my cake, so I hoped that my cherries were well-distributed. I threw the cake in the fridge and got on with my toppings.

BDB Cherry Cake Flip
Jewels of cherry goodness or pox of sunken doom?

Ice, Ice, Baby! While my cake was in the fridge, I toasted my nuts, keeping my eye on them (Unlike Kate, who had to bin a pan of blackened nuts). I then got on making my icing. I’ve had some experience making a thick icing using citrus and icing sugar, and I’ve made the gamut from thin and runny to thick and gloopy. I’ve found the trick is to adding the liquid slowly and whisking so that the icing makes a thick ball of icing sugar that clings to the whisk. Continue whisking and adding liquid a half tablespoon at a time until there is enough liquid that the icing just lets go of the whisk. I don’t dare add another drop of juice after that. I find that that makes an icing that is pipe-able and not so thin that it gets lost in your cake.

When I had about ten minutes left, I took my cake out of the fridge. It was still barely warm, but I figured with the thickness of my icing, it was cool enough to decorate. Besides, I was racing the clock. I paused for but a moment, asking myself to pipe or not to pipe? Nancy piped her icing in a perfect zig-zag over her cake, which impressed the judges. Mary complimented that her impeccable ice-job “proves that she can do things with precision.” My piping skills would probably prove that I don’t practice my piping enough but I thought that if I cut my piping bag an inch or so in like Chetna did, I could control my icing more than if I spooned it on the cake like Mary did in the masterclass. Ultimately, I went with the spoon. 175 g of icing sugar didn’t look like a lot of icing to me, and I didn’t want to loose any of that white, tarty goodness in the piping bag.

Am I pleased with my icing job? Eh, no, but it was time to place the cherries. Some of the bakers halved their cherries while others left them whole a top their cake. Jordan, who failed to read the instructions and did not reserve the 5 cherries for the top of the cake, was out of luck.In the masterclass, Mary had Paul cut the five remaining cherries into eighths, much to his chagrin, and then place those on the cake. I decided to stay true to her method and stick the shiny, red crescents onto my cake. I then, Martha style, picked the most perfectly toasted and shaped almonds to adorn my cake.

BDB Cherry Cake Iced

Did I make time?? Um, technically no, but if I had Mel and Sue breathing down my neck giving my 5 minute warnings, I totally would have. My 2 hour 11 minute timer went off while I was placing my almonds.

The Gingham Altar

I, of course, don’t have Mary Berry and Paul Hollywood scrutinizing my bakes, but I presented Mary Berry Cherry Cake to my parents’ for dessert after Easter Dinner. Dinner was delicious, but all I could think was “are my cherries suspended, or aren’t they?”

BDB Easter Dinner
My cake in a place of honor next to the other carbs! Bonus points if you can spot where Brad nicked an almond, the bastard.

Does it make the cut? The moment of truth! Time to slice the cake! How do you like them cherries? Little red gems perfectly suspended in yellow cake. Relief! Admittedly, not all of the slices were as perfect as that one. Perhaps in the scooping and leveling phase, I could have been more cognizant that I had even cherries in each scoop, but every slice had cherries, so I’m going to call that a success.

BDB Cherry Cake The Cut

The actual cake was lemony and yummy. The icing is super tart, which is to my liking. The bake maaaaaay have been a bit dry, though I couldn’t get my parents and husband to admit it, but I think my simple little cherry cake would not have put me on the chopping block that week. I think I’d be somewhere in the middle with Kate around number 6. She also had a fine distribution of cherries but was also had a cake that was a bit dry. She did a neater icing job than me, but her almonds were a bit caught, so I could be somewhere between Kate and Diana.

I would have been nowhere near Nancy with her “perfect nuts” (“Wow! To be commended on your nuts by Mary Berry!” Gotta love Sue!) , I’m pretty pleased with my theoretical standing in my first technical bake. I was relieved at the finish. Like Luis, I wanted to exclaim “Come on, Diana! High five me!”

The Recipe: Mary Berry’s Cherry Cake

Tools

Food Scale

23 cm Ring Mold (9.75” Savarin Mold)

Cake Ingredients

200 g of Glace Cherries (Plus 5 for decorating)

225 g of Self-Rising Flour

175 g of Softened Butter

175 g of Caster Sugar

50 g of Ground Almonds

Zest of a Lemon

3 whole large eggs

Icing Ingredients

175 g of icing sugar

Juice of 1 Lemon, strained

Flaked/Sliced Almonds

  1. Prep your oven and pan. Pre-heat your oven to 160 C fan (320 F fan, 345 degrees F in a conventional oven) and grease your tin with butter.
  2. Prepare the Cherries. Quarter, rinse, and dry the cherries with a kitchen towel. Borrow a tablespoon of flour to coat the cherries.
  3. All-In-One Method. Add softened butter, caster sugar, ground almonds, lemon zest, 3 large whole eggs. Combine ingredients until well combined into a stiff mixture.
  4. Cherry time! Fold in cherries.
  5. Put in tin. Scoop in mixture and level.
  6. Bake! For about 35 (46 in conventional oven) minutes until it is well risen and a pale golden brown.
  7. Cool, flip out, and cool. Let the cake cool in the tin for 10 minutes until the cake is shrinking from the sides, turn out the cake, and then let it cool completely.
  8. Make icing. Slowly whisk juice into the icing sugar a little at a time until it is still thick but will drip down the side of the cake.
  9. Toast almonds. On the stove in a dry pan on medium heat, stirring constantly until they are slightly brown and fragrant.
  10. Decorate! Once the cake is entirely cooled, cut the remaining cherries into 8ths. Ice the cake thickly, encouraging it to drizzle down the side. Sprinkle on toasted almonds and cherry eighths.